Martin Tan's Bloghttps://mrtan.me/feed.xmlhttps://mrtan.me/image/logo.jpg2025-11-03T04:46:27+08:00Martin Tan<![CDATA[How to Setup a Gitlab CE Docker instance 2026]]>https://mrtan.me/post/how-to-setup-a-gitlab-ce-docker-instance-2026.html
Why Self-Host GitLab CE?
There's something compelling about running your own Git server instead of relying on a cloud provider. GitLab CE (Community Edition) is completely free and open-source, which means you're not locked into anyone's ecosystem or pricing model. When you self-host, you get total control over your data - your repositories stay exactly where you want them, your CI/CD pipelines run on infrastructure you own, and you're not subject to any vendor's terms of service changes. Plus, from a cost perspective, if you already have a server running somewhere, the marginal cost of adding GitLab is basically zero. You get the full Git hosting experience with merge requests, code review, project management, and a powerful CI/CD system - essentially everything you'd get from GitHub or GitLab.com, but under your own roof.
Prerequisites
Before you dive in, make sure you have a few things in place. You'll obviously need Docker installed and running - I'm assuming you're comfortable with Docker at this point since you're self-hosting. GitLab isn't exactly lightweight, so you'll want at least 4 CPU cores and 12GB of RAM available for the container to breathe comfortably. For accessing it, you'll need either a local domain name (I use gitlab.test for local development, which you can add to your /etc/hosts) or an IP address. And while it's not strictly required, I'd strongly recommend setting up persistent storage directories for config, logs, and data - losing everything when a container restarts is a painful lesson I don't recommend learning firsthand.
Setup the GitLab Instance
Here's the nice part - you don't need Docker Compose or any complex orchestration for this. A single Docker container is absolutely sufficient for a development or small team setup, which keeps things refreshingly simple.
Start by browsing to Docker Hub and checking out the available GitLab CE versions. Pick whichever version you prefer - I've found newer versions are generally more stable, but if you need a specific feature from an older release, you can obviously go with that.
Once you've decided on a version, run this command:
Let me break down what each flag does here because it matters:
--detach: Runs the container in the background so you get your terminal back
--env GITLAB_OMNIBUS_CONFIG: This sets the external URL that GitLab will use - this is important because GitLab needs to know how to construct links and authentication URLs
--cpus="4": Gives the container access to 4 CPU cores - GitLab really benefits from having enough CPU, and 4 is a reasonable minimum
--memory=12g: Allocates 12GB of RAM - GitLab's Puma server and other processes are memory-hungry, so this is pretty essential
--volume: These three volume mounts ensure your data survives container restarts:
config: Where all your GitLab settings live
logs: Application logs for debugging
data: The actual repositories, databases, and everything else important
--shm-size 256m: Shared memory allocation - this helps with performance and prevents some weird errors you might encounter otherwise
If you're just kicking the tires and don't care about losing data, you can completely skip the --volume flags. But honestly, it's worth the 30 seconds to create those directories and get persistence working.
After running the command, grab a coffee because GitLab takes a few minutes to initialize - probably 2-3 minutes depending on your hardware. You can watch the startup process with:
docker logs -f gitlab-local
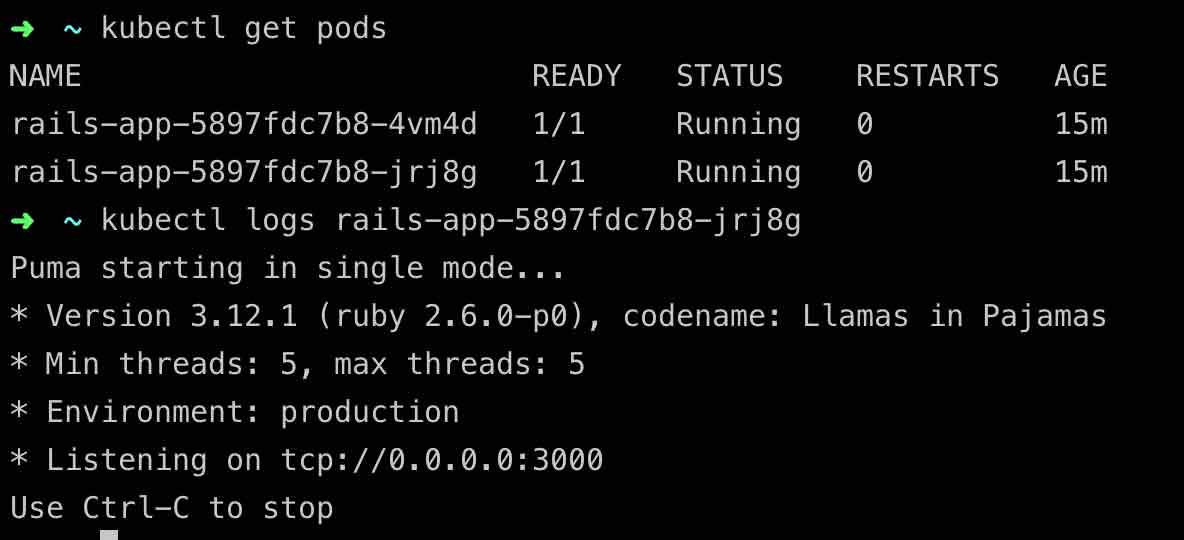
Once you see messages indicating it's ready (look for something about Unicorn or Puma starting up), you can visit http://gitlab.test in your browser. GitLab will ask you to set a new password for the root user - the initial temporary password is stored in a file inside the container at /etc/gitlab/initial_root_password. You can grab it with:
That first login feels good - you're now running your own Git server.
Setting Up the Runner
Now here's where things get interesting. A GitLab Runner is basically a service that actually executes your CI/CD jobs - it's the thing that runs your tests, builds your Docker images, deploys your code, or whatever else you've defined in your pipeline. Without a runner, your GitLab instance is just a fancy repository browser; nothing actually happens when you push code.
There are two approaches here. The first is the quick and dirty method:
This works fine, and the runner will happily execute jobs. The problem is that when the container stops or restarts, all the runner configuration goes away with it, and you'll need to re-register it next time. If you're just experimenting, that's fine. But if you're actually using this in any kind of real way, you'll want persistence.
Here's the version I recommend - it takes literally one extra line to mount a config directory:
--rm: Automatically cleans up the container when it stops - this keeps things tidy
-v /var/run/docker.sock: This mounts the Docker socket into the container, which lets the runner spawn Docker containers to actually run your jobs
-v /YOUR_PATH_TO_SAVE/docker-runner/config:/etc/gitlab-runner: This persists the runner configuration so you don't lose it on restarts
Replace /YOUR_PATH_TO_SAVE with wherever you want to keep the config - maybe something like $HOME/gitlab-runner/config or /opt/gitlab-runner/config.
I'd really suggest going with the persistent version from the start. Those extra 30 seconds of setup will save you from re-registering the runner every time your machine reboots.
Register the Runner with GitLab
Now that both GitLab and the runner are running, you need to tell them about each other - this is the registration process. It's actually pretty straightforward, and the GitLab UI guides you through it pretty nicely.
Here's the step-by-step process, which honestly just takes a few minutes:
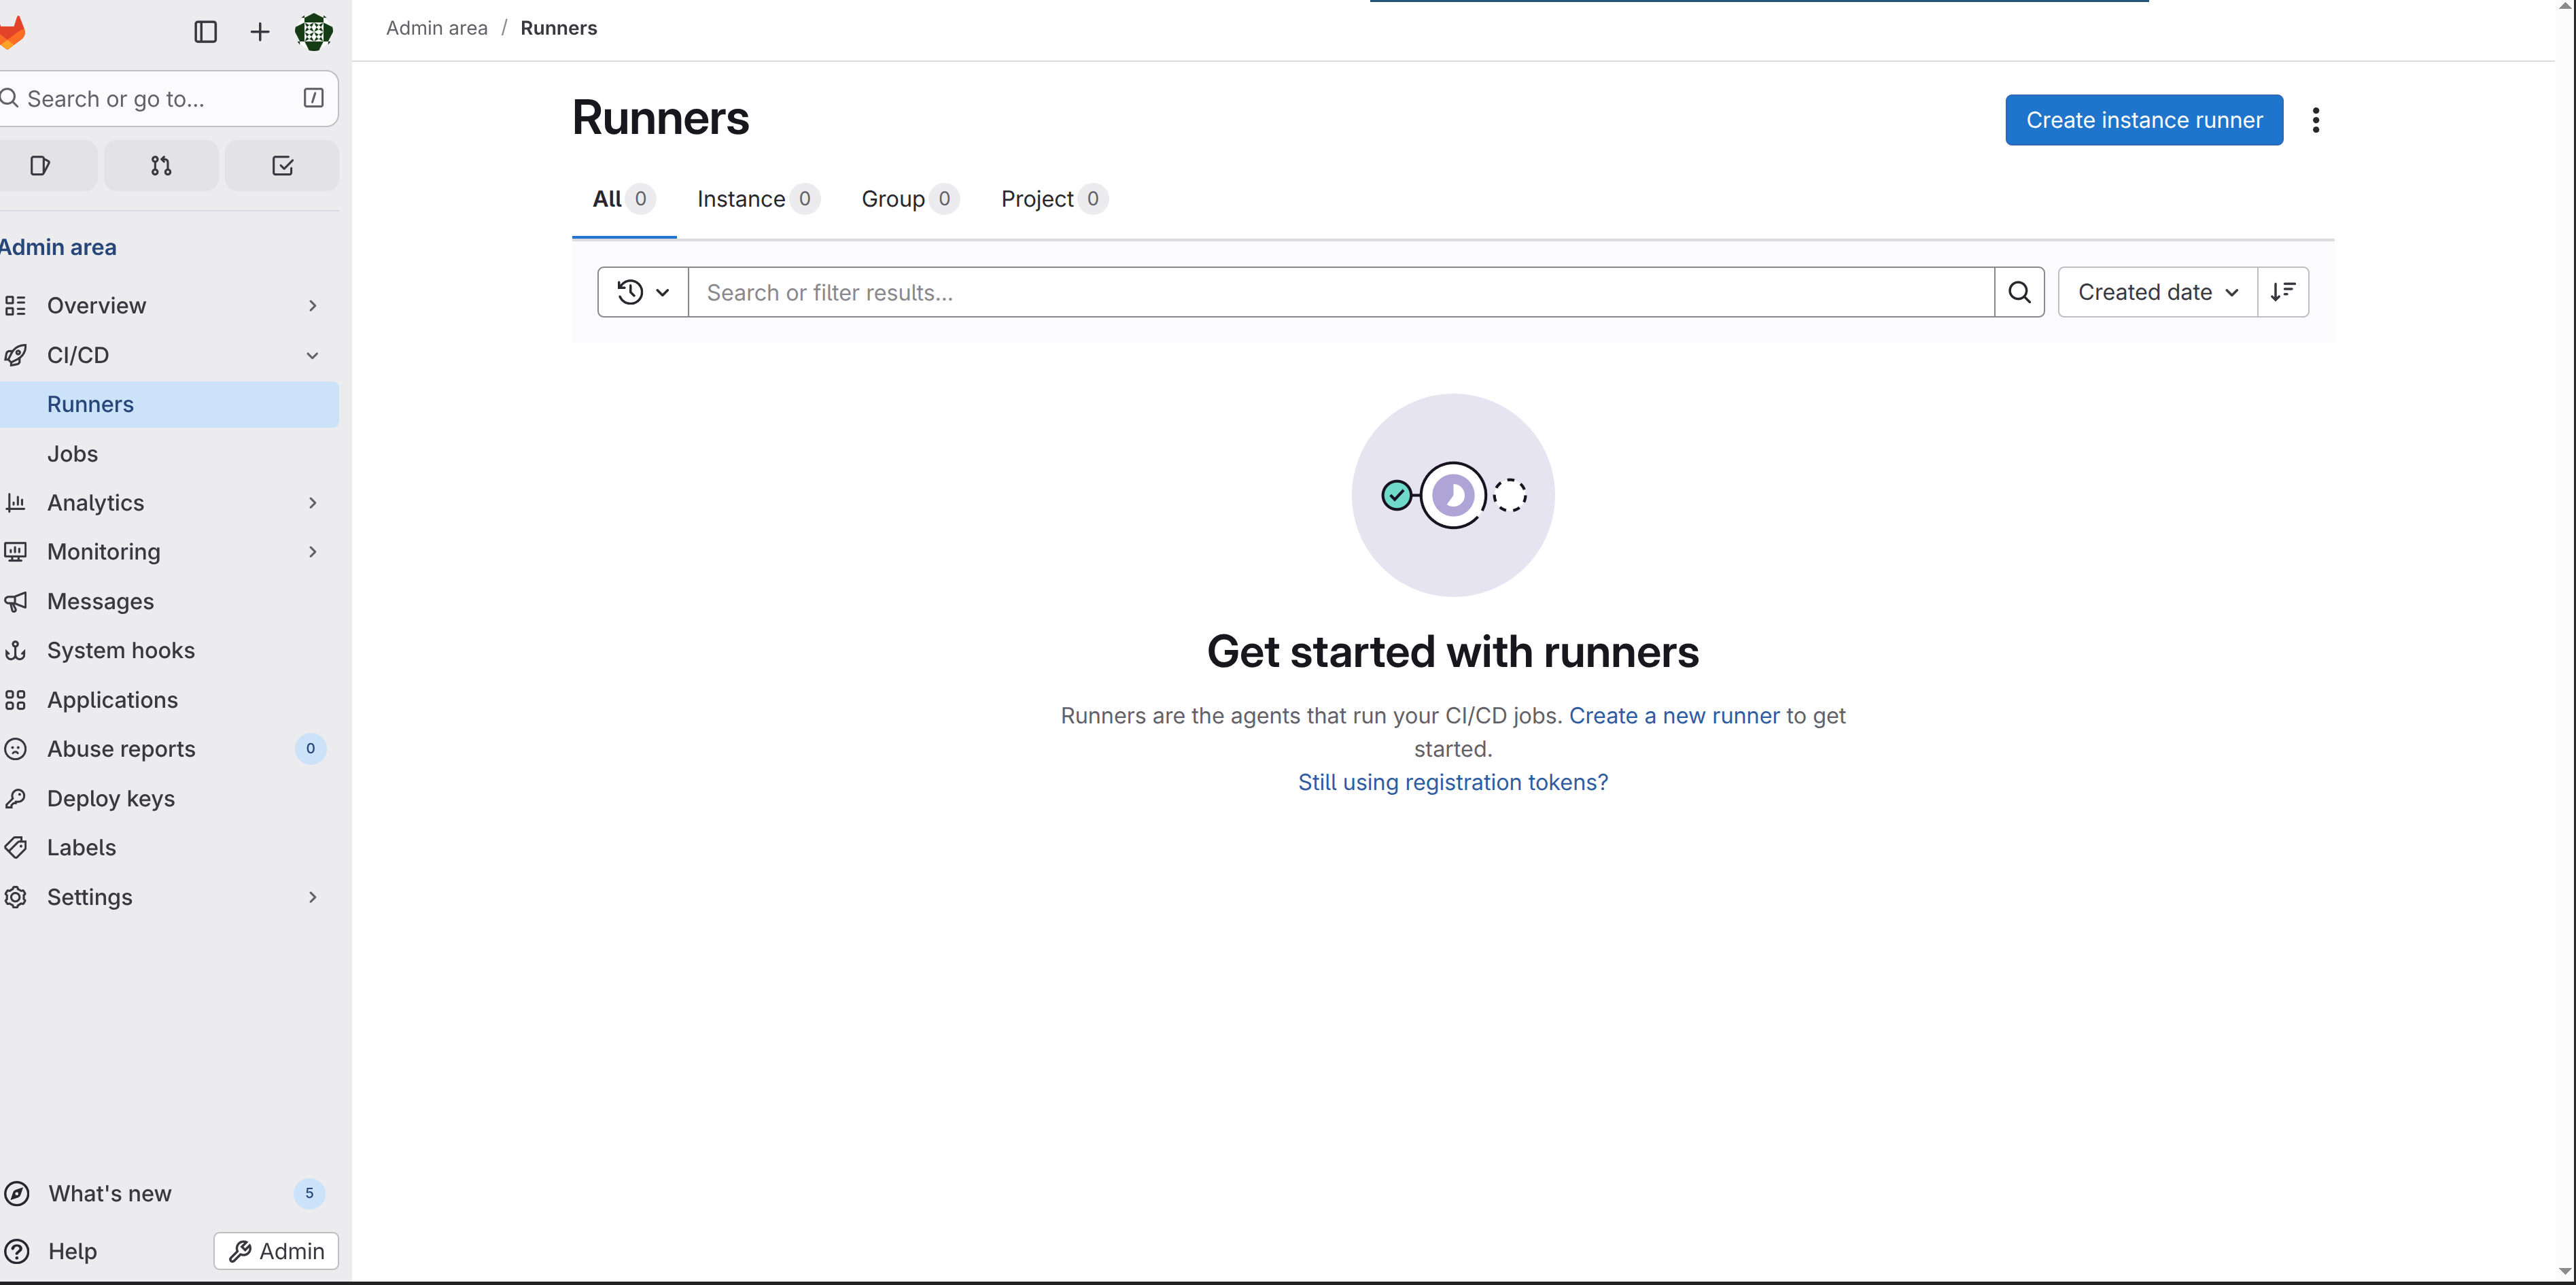
Navigate to http://gitlab.test/admin/runners - this is the runners administration page where you can see all your runners and create new ones
Click the "Create instance runner" button - don't let the terminology throw you; this just means you're creating a runner that belongs to the GitLab instance and isn't tied to a specific project
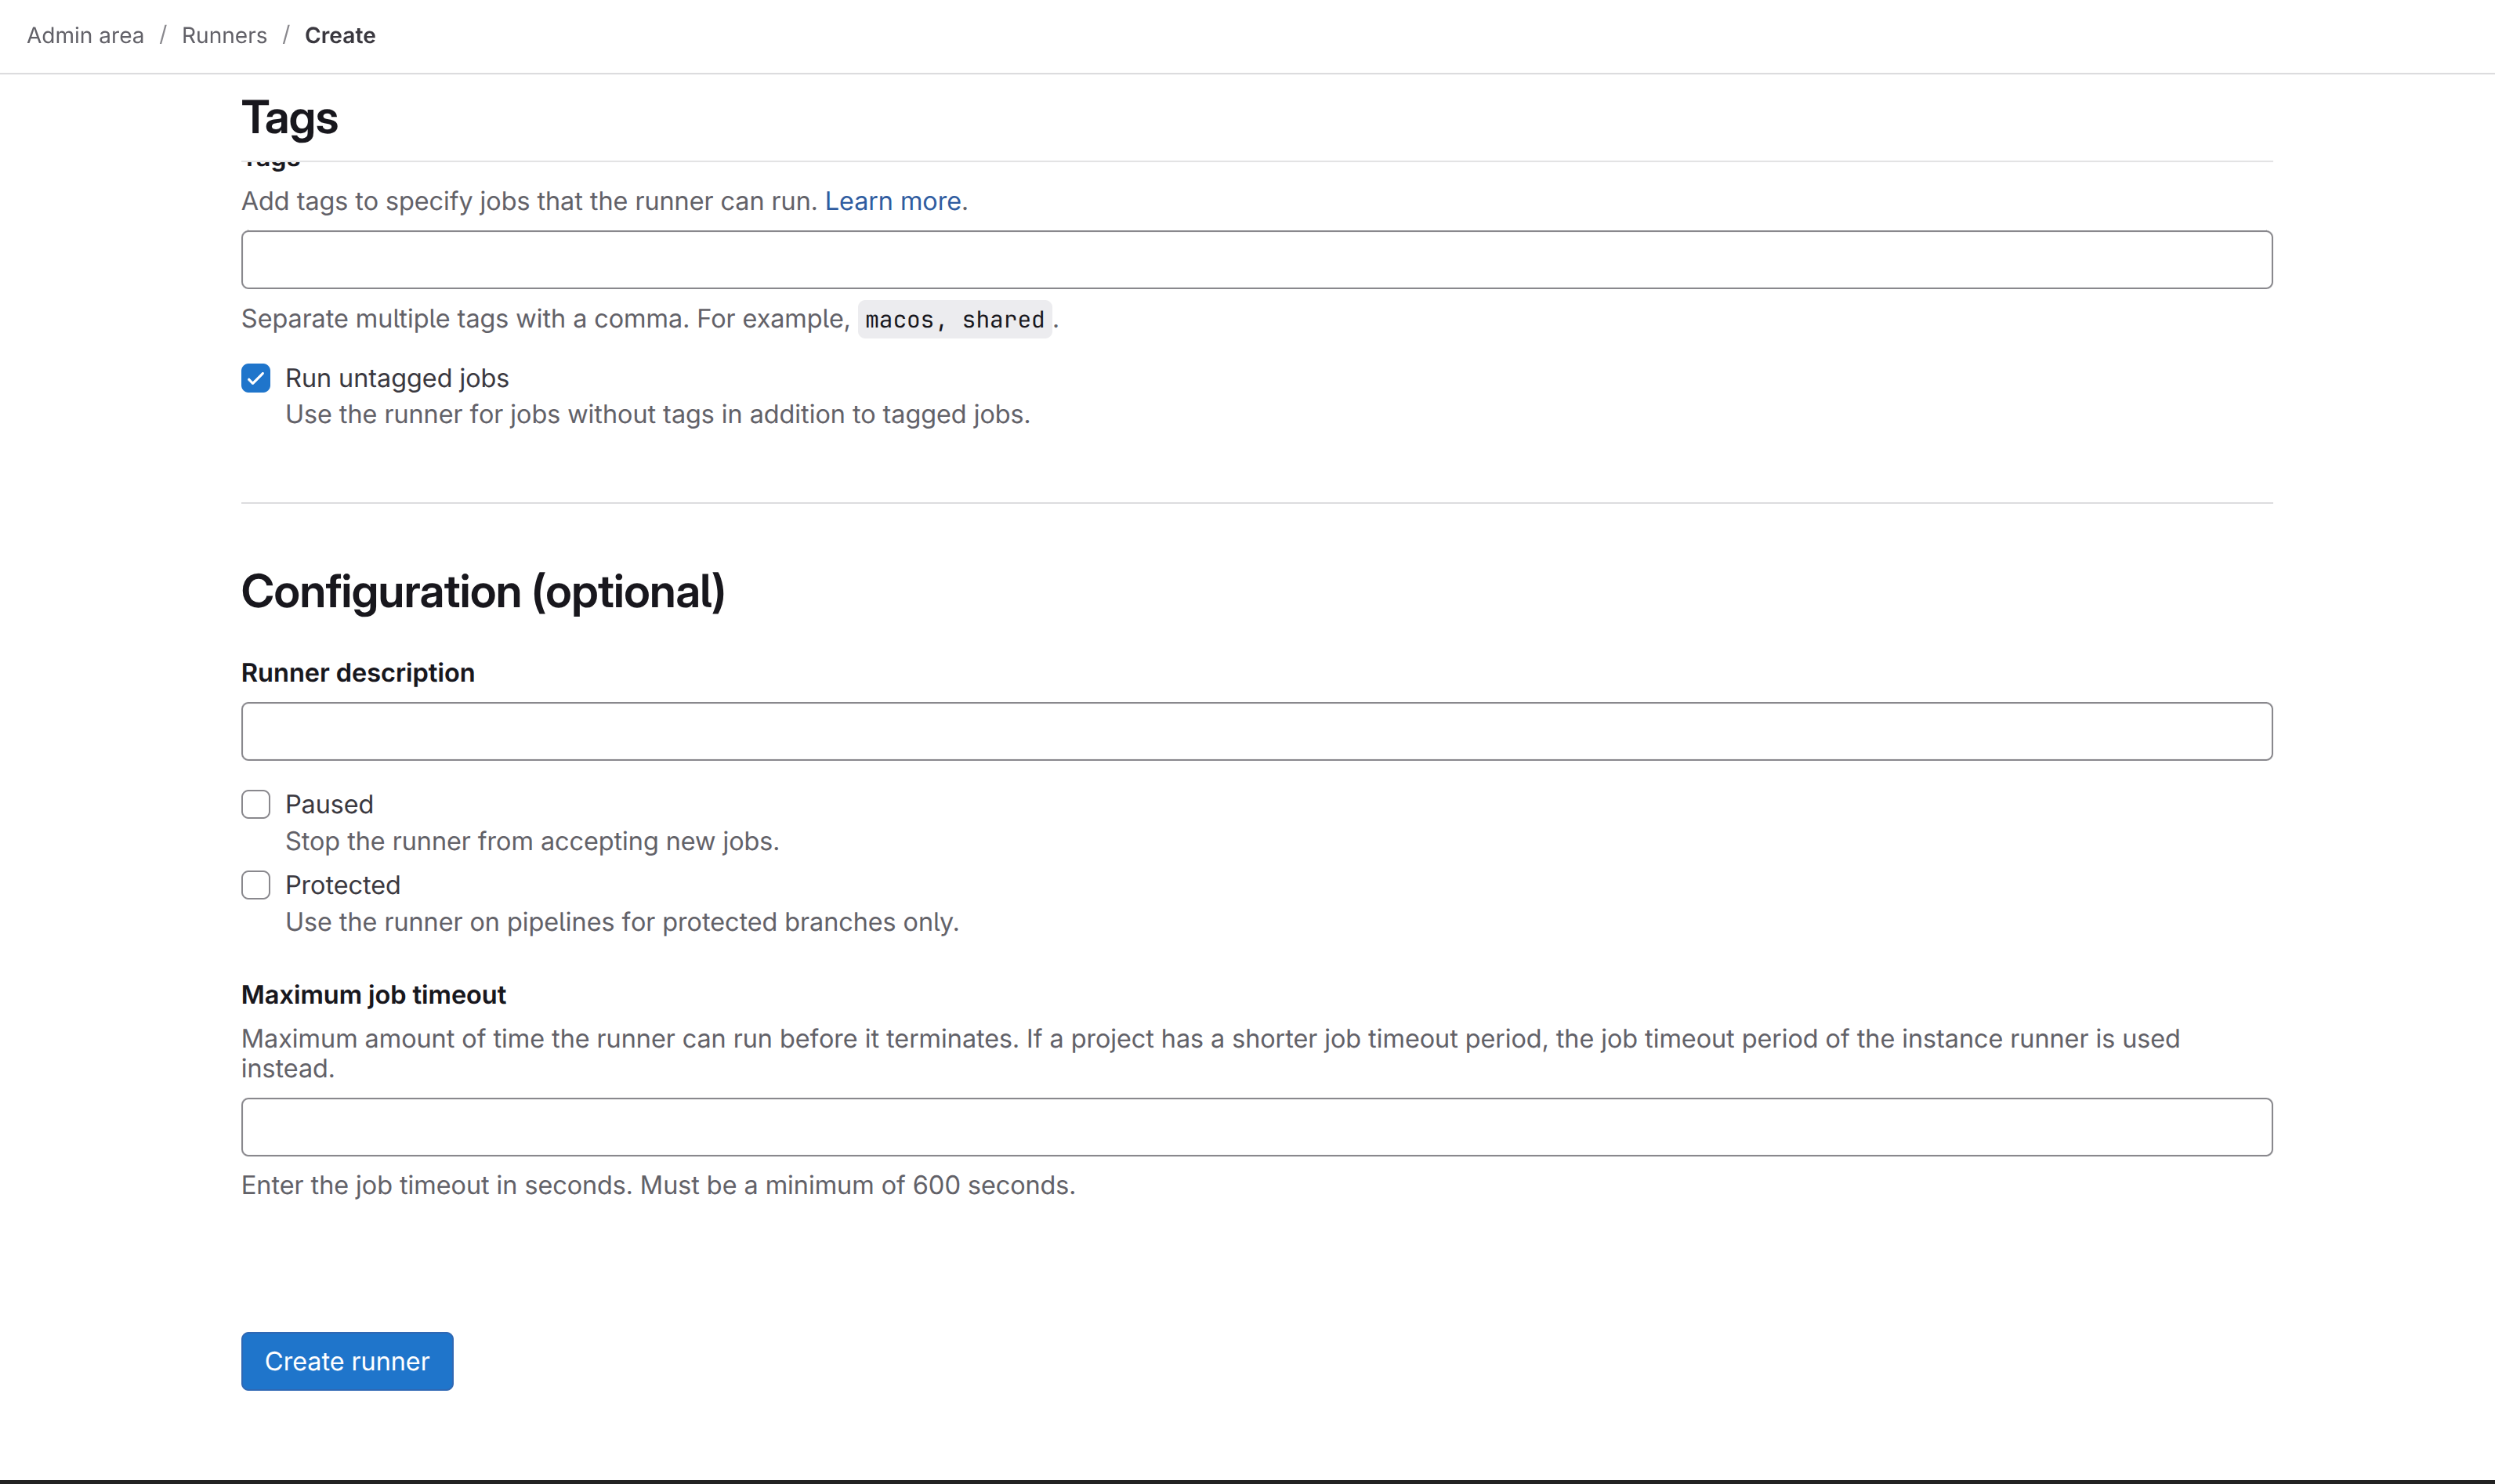
Check the "Run untagged jobs" checkbox - this lets the runner execute jobs that don't have specific tags, which is what you want for general use
Click "Create runner" and GitLab will generate a registration token for you - this token is basically a password that lets your runner prove it belongs to your GitLab instance
Copy that token somewhere you can access it in your terminal
Now in your terminal, register the runner by executing this inside the runner container:
Obviously replace <PASTE_TOKEN_HERE> with the actual token you just copied. The --executor docker part tells the runner to use Docker for executing jobs, and alpine:latest is a lightweight base image for running commands. This is a sensible default but you can change it later if you need.
Once the registration completes, refresh the runners page and you should see your runner listed there with a green checkmark showing it's active and healthy
At this point, your runner is alive and ready to execute jobs. Any CI/CD pipeline you define in a .gitlab-ci.yml file will now actually run when you push code.
Troubleshooting: Runner Running But Not Picking Up Jobs
This is probably the most frustrating scenario - you can see the runner is there, it's showing as active in the admin panel with a green checkmark, but when you push code and create a pipeline, the jobs just sit in a "pending" state forever. The runner completely ignores them. This usually happens because of one specific thing: the runner and the pipeline jobs have a tag mismatch.
Here's how the tag system works. When you define a job in your .gitlab-ci.yml file, you can optionally specify tags like this:
test:
  tags:
    - docker
  script:
    - npm test
This tells GitLab: "I want this job to run on a runner that has the docker tag." Now, when you register your runner, you can assign it tags. If you didn't assign any tags during registration (which is the common case), your runner gets no tags by default - it's literally a runner with an empty tag list.
The problem is that if your job explicitly specifies tags but your runner has no tags, there's no match, and the job will never run. It's like putting up a job posting that says "must speak French" and then hiring someone who only speaks English - they're never going to apply.
The fix is usually one of these:
Option 1: Make your runner accept untagged jobs (the easiest way)
Go back to http://gitlab.test/admin/runners, click on your runner, and make sure the "Run untagged jobs" toggle is enabled. This is exactly what you did in step 3 of the registration process. If you enabled it but jobs still aren't running, try toggling it off and back on again - sometimes it needs a refresh.
Option 2: Remove tags from your pipeline jobs
In your .gitlab-ci.yml, just don't specify any tags at all. By default, untagged jobs will match any runner that has "Run untagged jobs" enabled. This is probably what you want for a small setup anyway.
test:
  script:
    - npm test
Option 3: Add tags to your runner and match them in your jobs
If you really want to use tags (which can be useful for more complex setups with multiple runners), you need to match them exactly. Go to your runner settings, add a tag like my-runner, then in your .gitlab-ci.yml specify tags: [my-runner]. But honestly, for a first setup, this is overcomplicating things.
Pro tip: Check the pipeline job status page to see why it's not running. Click on a pending job and you should see a message like "This job could not be run because no runners are available" or "Runner can't pick job because it doesn't match tags." These messages are actually super helpful and will tell you exactly what the problem is.
The vast majority of the time, the issue is just that "Run untagged jobs" isn't enabled or the runner needs a moment to reconnect. But understanding the tag system will save you hours of confusion, so it's worth knowing how it actually works.
Next Steps
Congratulations - you've just built your own Git hosting platform. This is actually a pretty solid foundation. With GitLab and a runner both up and running, you now have the infrastructure to do some genuinely useful things.
You can start creating projects and pushing repositories to it like you would with GitHub or GitLab.com. The UI is almost identical, so if you're familiar with GitLab, you'll feel right at home. More importantly though, you can now define CI/CD pipelines by adding a .gitlab-ci.yml file to your repositories - that's where the real power comes in. You can run automated tests on every push, build Docker images, deploy applications, run linting checks, or basically anything else you can script.
The merge request workflow is also fully functional - you can have team members (or just yourself) open merge requests, request code reviews, and use all the collaboration features. The beauty of self-hosting is that all of this runs on your own hardware with no SaaS bills or vendor lock-in.
If you run into issues during the setup, the logs are your friend - docker logs gitlab-local and docker logs gitlab-docker-runner will show you what's happening. And honestly, once this is running, it's pretty stable. I've had instances running like this for months without any real maintenance required beyond the occasional restart.
Your self-hosted GitLab instance is now ready for development and CI/CD automation.
]]>
Why Self-Host GitLab CE?
There's something compelling about running your own Git server instead of relying on a cloud provider. GitLab CE (Community Edition) is completely free and open-source, which means you're not locked into anyone's ecosystem or pricing model. When you self-host, you get total control over your data - your repositories stay exactly where you want them, your CI/CD pipelines run on infrastructure you own, and you're not subject to any vendor's terms of service changes. Plus, from a cost perspective, if you already have a server running somewhere, the marginal cost of adding GitLab is basically zero. You get the full Git hosting experience with merge requests, code review, project management, and a powerful CI/CD system - essentially everything you'd get from GitHub or GitLab.com, but under your own roof.
Prerequisites
Before you dive in, make sure you have a few things in place. You'll obviously need Docker installed and running - I'm assuming you're comfortable with Docker at this point since you're self-hosting. GitLab isn't exactly lightweight, so you'll want at least 4 CPU cores and 12GB of RAM available for the container to breathe comfortably. For accessing it, you'll need either a local domain name (I use gitlab.test for local development, which you can add to your /etc/hosts) or an IP address. And while it's not strictly required, I'd strongly recommend setting up persistent storage directories for config, logs, and data - losing everything when a container restarts is a painful lesson I don't recommend learning firsthand.
Setup the GitLab Instance
Here's the nice part - you don't need Docker Compose or any complex orchestration for this. A single Docker container is absolutely sufficient for a development or small team setup, which keeps things refreshingly simple.
Start by browsing to Docker Hub and checking out the available GitLab CE versions. Pick whichever version you prefer - I've found newer versions are generally more stable, but if you need a specific feature from an older release, you can obviously go with that.
Once you've decided on a version, run this command:
Let me break down what each flag does here because it matters:
--detach: Runs the container in the background so you get your terminal back
--env GITLAB_OMNIBUS_CONFIG: This sets the external URL that GitLab will use - this is important because GitLab needs to know how to construct links and authentication URLs
--cpus="4": Gives the container access to 4 CPU cores - GitLab really benefits from having enough CPU, and 4 is a reasonable minimum
--memory=12g: Allocates 12GB of RAM - GitLab's Puma server and other processes are memory-hungry, so this is pretty essential
--volume: These three volume mounts ensure your data survives container restarts:
config: Where all your GitLab settings live
logs: Application logs for debugging
data: The actual repositories, databases, and everything else important
--shm-size 256m: Shared memory allocation - this helps with performance and prevents some weird errors you might encounter otherwise
If you're just kicking the tires and don't care about losing data, you can completely skip the --volume flags. But honestly, it's worth the 30 seconds to create those directories and get persistence working.
After running the command, grab a coffee because GitLab takes a few minutes to initialize - probably 2-3 minutes depending on your hardware. You can watch the startup process with:
docker logs -f gitlab-local
Once you see messages indicating it's ready (look for something about Unicorn or Puma starting up), you can visit http://gitlab.test in your browser. GitLab will ask you to set a new password for the root user - the initial temporary password is stored in a file inside the container at /etc/gitlab/initial_root_password. You can grab it with:
That first login feels good - you're now running your own Git server.
Setting Up the Runner
Now here's where things get interesting. A GitLab Runner is basically a service that actually executes your CI/CD jobs - it's the thing that runs your tests, builds your Docker images, deploys your code, or whatever else you've defined in your pipeline. Without a runner, your GitLab instance is just a fancy repository browser; nothing actually happens when you push code.
There are two approaches here. The first is the quick and dirty method:
This works fine, and the runner will happily execute jobs. The problem is that when the container stops or restarts, all the runner configuration goes away with it, and you'll need to re-register it next time. If you're just experimenting, that's fine. But if you're actually using this in any kind of real way, you'll want persistence.
Here's the version I recommend - it takes literally one extra line to mount a config directory:
--rm: Automatically cleans up the container when it stops - this keeps things tidy
-v /var/run/docker.sock: This mounts the Docker socket into the container, which lets the runner spawn Docker containers to actually run your jobs
-v /YOUR_PATH_TO_SAVE/docker-runner/config:/etc/gitlab-runner: This persists the runner configuration so you don't lose it on restarts
Replace /YOUR_PATH_TO_SAVE with wherever you want to keep the config - maybe something like $HOME/gitlab-runner/config or /opt/gitlab-runner/config.
I'd really suggest going with the persistent version from the start. Those extra 30 seconds of setup will save you from re-registering the runner every time your machine reboots.
Register the Runner with GitLab
Now that both GitLab and the runner are running, you need to tell them about each other - this is the registration process. It's actually pretty straightforward, and the GitLab UI guides you through it pretty nicely.
Here's the step-by-step process, which honestly just takes a few minutes:
Navigate to http://gitlab.test/admin/runners - this is the runners administration page where you can see all your runners and create new ones
Click the "Create instance runner" button - don't let the terminology throw you; this just means you're creating a runner that belongs to the GitLab instance and isn't tied to a specific project
Check the "Run untagged jobs" checkbox - this lets the runner execute jobs that don't have specific tags, which is what you want for general use
Click "Create runner" and GitLab will generate a registration token for you - this token is basically a password that lets your runner prove it belongs to your GitLab instance
Copy that token somewhere you can access it in your terminal
Now in your terminal, register the runner by executing this inside the runner container:
Obviously replace <PASTE_TOKEN_HERE> with the actual token you just copied. The --executor docker part tells the runner to use Docker for executing jobs, and alpine:latest is a lightweight base image for running commands. This is a sensible default but you can change it later if you need.
Once the registration completes, refresh the runners page and you should see your runner listed there with a green checkmark showing it's active and healthy
At this point, your runner is alive and ready to execute jobs. Any CI/CD pipeline you define in a .gitlab-ci.yml file will now actually run when you push code.
Troubleshooting: Runner Running But Not Picking Up Jobs
This is probably the most frustrating scenario - you can see the runner is there, it's showing as active in the admin panel with a green checkmark, but when you push code and create a pipeline, the jobs just sit in a "pending" state forever. The runner completely ignores them. This usually happens because of one specific thing: the runner and the pipeline jobs have a tag mismatch.
Here's how the tag system works. When you define a job in your .gitlab-ci.yml file, you can optionally specify tags like this:
test:
  tags:
    - docker
  script:
    - npm test
This tells GitLab: "I want this job to run on a runner that has the docker tag." Now, when you register your runner, you can assign it tags. If you didn't assign any tags during registration (which is the common case), your runner gets no tags by default - it's literally a runner with an empty tag list.
The problem is that if your job explicitly specifies tags but your runner has no tags, there's no match, and the job will never run. It's like putting up a job posting that says "must speak French" and then hiring someone who only speaks English - they're never going to apply.
The fix is usually one of these:
Option 1: Make your runner accept untagged jobs (the easiest way)
Go back to http://gitlab.test/admin/runners, click on your runner, and make sure the "Run untagged jobs" toggle is enabled. This is exactly what you did in step 3 of the registration process. If you enabled it but jobs still aren't running, try toggling it off and back on again - sometimes it needs a refresh.
Option 2: Remove tags from your pipeline jobs
In your .gitlab-ci.yml, just don't specify any tags at all. By default, untagged jobs will match any runner that has "Run untagged jobs" enabled. This is probably what you want for a small setup anyway.
test:
  script:
    - npm test
Option 3: Add tags to your runner and match them in your jobs
If you really want to use tags (which can be useful for more complex setups with multiple runners), you need to match them exactly. Go to your runner settings, add a tag like my-runner, then in your .gitlab-ci.yml specify tags: [my-runner]. But honestly, for a first setup, this is overcomplicating things.
Pro tip: Check the pipeline job status page to see why it's not running. Click on a pending job and you should see a message like "This job could not be run because no runners are available" or "Runner can't pick job because it doesn't match tags." These messages are actually super helpful and will tell you exactly what the problem is.
The vast majority of the time, the issue is just that "Run untagged jobs" isn't enabled or the runner needs a moment to reconnect. But understanding the tag system will save you hours of confusion, so it's worth knowing how it actually works.
Next Steps
Congratulations - you've just built your own Git hosting platform. This is actually a pretty solid foundation. With GitLab and a runner both up and running, you now have the infrastructure to do some genuinely useful things.
You can start creating projects and pushing repositories to it like you would with GitHub or GitLab.com. The UI is almost identical, so if you're familiar with GitLab, you'll feel right at home. More importantly though, you can now define CI/CD pipelines by adding a .gitlab-ci.yml file to your repositories - that's where the real power comes in. You can run automated tests on every push, build Docker images, deploy applications, run linting checks, or basically anything else you can script.
The merge request workflow is also fully functional - you can have team members (or just yourself) open merge requests, request code reviews, and use all the collaboration features. The beauty of self-hosting is that all of this runs on your own hardware with no SaaS bills or vendor lock-in.
If you run into issues during the setup, the logs are your friend - docker logs gitlab-local and docker logs gitlab-docker-runner will show you what's happening. And honestly, once this is running, it's pretty stable. I've had instances running like this for months without any real maintenance required beyond the occasional restart.
Your self-hosted GitLab instance is now ready for development and CI/CD automation.
]]>2025-11-03T04:46:27-06:00Martin Tan<![CDATA[Rails is Still the GOAT for Building Web Apps - My Experience with Gisia]]>https://mrtan.me/post/rails-is-still-the-goat-for-building-web-apps-my-experience-with-gisia.html
When I decided to build a personal Git hosting server, I had a choice: self-host GitLab or build something lighter. I chose the latter, and here's why Rails made it ridiculously fast to build Gisia – a lightweight alternative that proves Rails is still the king for modern web applications.
Why Not GitLab? Why Build Gisia Instead?
GitLab is incredible, but it's also heavy. Here's the reality:
Resource hungry: Requires Vue.js, Elasticsearch, and more. Just getting it running locally takes significant setup.
Bloated for small teams: If you just need Git hosting + basic CI/CD, you're carrying around features you'll never use.
Overkill for personal/small-team use: The complexity overhead isn't worth it when you just want a focused, maintainable codebase.
Gisia takes inspiration from GitLab's feature set but strips away the unnecessary complexity. It's built for:
Personal Git hosting servers
Small teams that need CI/CD without the overhead
Developers who want to understand and customize their Git platform
Anyone tired of managing ten different services just for version control
The result? A single Rails app with PostgreSQL, minimal external dependencies, and a codebase you can actually understand and modify.
The Frontend Problem: Why I Almost Chose a JavaScript Framework
When I started Gisia, I faced a common dilemma: build a SPA with React/Vue, or keep it simple?
I chose Rails + Hotwired, and it saved me weeks of development time.
The Problem with Heavy Frontend Frameworks
Most modern Git hosting UIs involve:
Merge request creation and editing
Real-time status updates for CI/CD pipelines
Interactive forms and modals
Live notifications
Traditionally, this means building a JavaScript SPA with:
React/Vue/Svelte + separate frontend codebase
Complex build tools (Webpack, Vite, etc.)
NPM dependency management and lock files
Redux/Zustand/Pinia state management
API contracts to maintain between frontend and backend
With a 20,000+ line codebase, you're managing two codebases instead of one.
Hotwired to the Rescue
Gisia uses Turbo and Stimulus – Rails' secret weapons for modern interactivity without the JavaScript bloat.
Turbo handles navigation and form submissions elegantly:
That's it. A few lines of JavaScript for interactive color picking on label creation. In React? You'd have 50+ lines of hooks and state management.
The result: Gisia's entire JavaScript footprint is tiny. No webpack, no npm dependency hell, just simple, declarative controllers that enhance server-rendered HTML.
Solid Queue: Simplifying Background Jobs for CI/CD
Gisia includes CI/CD pipeline support – running builds, executing jobs, storing artifacts. This traditionally means:
Sidekiq + Redis setup
Complex job retry logic
Deployment headaches
Solid Queue changed everything. It's Rails' new job processing framework, and it's fast.
# app/jobs/ci/build_job.rb
class Ci::BuildJob < ApplicationJob
  queue_as :default

  def perform(build_id)
    build = Ci::Build.find(build_id)
    build.execute!
  end
end
No Redis. No worker processes to manage. Solid Queue uses your existing PostgreSQL database and processes jobs in the background. For Gisia, this means:
CI/CD pipelines run smoothly without extra infrastructure
Job execution is straightforward and debuggable
Scaling is as simple as adding more Rails processes
Compare this to GitLab's architecture where you need separate runner infrastructure, Redis for job queues, and complex coordination. Gisia handles it all with Rails + PostgreSQL.
Rails Architecture: Built for Speed
Here's how Gisia is structured, and why Rails conventions saved me massive amounts of time:
Rails handles this seamlessly. No custom connection logic needed.
Authentication & Authorization
Devise handles user auth. Custom Pundit-style policies handle permissions:
# app/policies/project_policy.rb
class ProjectPolicy
  def update?
    user.namespace.projects.include?(project)
  end
end
Simple, declarative, and testable.
Business Logic in Models and Concerns
Complex operations live in models and concerns, keeping controllers thin and logic organized. In Gisia, the MergeRequest model handles associations, validations, and query scopes directly. Concerns (like MergeRequests::Status and MergeRequests::MergeStatus) handle cross-cutting logic for state transitions and merge behavior. Instance methods encapsulate specific behavior like calculating commit counts.
This approach keeps business logic close to the data where it belongs. Controllers stay thin (under 15 lines per action), and everything is testable on the model without complex setup or service layer indirection.
Real Examples from Gisia
Interactive Label Management
Creating labels with custom colors uses Stimulus controllers for a clean, interactive experience:
// app/javascript/controllers/color_picker_controller.js
import { Controller } from '@hotwired/stimulus'

export default class extends Controller {
  static targets = ['preview']

  updatePreview() {
    const color = this.element.querySelector('input[type="text"]').value
    if (/^#[0-9A-F]{6}$/i.test(color)) {
      this.previewTarget.style.backgroundColor = color
    }
  }

  selectColor(event) {
    event.preventDefault()
    const color = event.target.dataset.colorValue
    const input = this.element.querySelector('input[type="text"]')
    input.value = color
    this.previewTarget.style.backgroundColor = color
  }
}
When a build completes (via Solid Queue jobs), a server-side event will broadcast updates. The browser automatically re-renders. Zero custom JavaScript orchestration needed.
Development Speed: The Real Win
Here's what matters: I built Gisia faster than I could have with any other tech stack.
A simple tech stack removes friction. With Rails, you get everything built-in: database migrations, ORM, testing framework, asset pipeline, background jobs, routing, authentication. You don't need to piece together 10 different libraries or spend days configuring build tools.
Compare this to a JavaScript SPA approach: you'd need to choose a frontend framework, pick a state management solution, configure a build tool (Webpack/Vite), decide on an API structure, set up API authentication, handle CORS, and manage environment variables across frontend and backend. Each decision adds complexity and time.
With Rails, these decisions are already made for you. You can focus on building features instead of configuring tooling. The conventional structure means new developers onboard faster. The opinionated defaults eliminate bikeshedding.
For Gisia specifically, this meant:
Building merge request logic in days instead of weeks
Implementing CI/CD pipelines without wrestling with job queues
Adding interactive features with Stimulus without learning a complex JavaScript framework
Writing tests that actually catch bugs, not fighting test setup
That's the Rails advantage: simplicity and velocity.
The Result
Gisia is a fully-featured Git hosting platform built in Rails 8 with:
User authentication and authorization
Project and namespace management
Merge requests with code review
CI/CD pipelines and builds
Real-time status updates
Interactive UI without heavy frontend frameworks
The entire codebase is maintainable, understandable, and ready for customization. All possible because Rails + Hotwired eliminated the JavaScript complexity that would have bloated the project.
Why Rails is Still the GOAT
Nowadays, people tend to reach for JavaScript frameworks, microservices, or trendy new languages. But Rails has strengths that remain unmatched:
For web applications, nothing is faster than Rails. Period.
For teams, Rails conventions eliminate endless bikeshedding.
For complexity, Rails handles databases, authentication, background jobs, and real-time features seamlessly.
For learning, a Rails codebase teaches you more about web development than 10 JavaScript frameworks.
Gisia proves it. I built a GitLab alternative with:
Minimal JavaScript footprint (no build pipeline overhead)
Minimal external dependencies
Clean, understandable code
Incredible development velocity
If you're building a web app in 2025, don't sleep on Rails. Especially if you're tired of JavaScript complexity.
Try Gisia
If you're interested in personal Git hosting or want to see Rails architecture in action, check out Gisia on GitHub.
Rails isn't dead. It's just better than ever.
]]>
When I decided to build a personal Git hosting server, I had a choice: self-host GitLab or build something lighter. I chose the latter, and here's why Rails made it ridiculously fast to build Gisia – a lightweight alternative that proves Rails is still the king for modern web applications.
Why Not GitLab? Why Build Gisia Instead?
GitLab is incredible, but it's also heavy. Here's the reality:
Resource hungry: Requires Vue.js, Elasticsearch, and more. Just getting it running locally takes significant setup.
Bloated for small teams: If you just need Git hosting + basic CI/CD, you're carrying around features you'll never use.
Overkill for personal/small-team use: The complexity overhead isn't worth it when you just want a focused, maintainable codebase.
Gisia takes inspiration from GitLab's feature set but strips away the unnecessary complexity. It's built for:
Personal Git hosting servers
Small teams that need CI/CD without the overhead
Developers who want to understand and customize their Git platform
Anyone tired of managing ten different services just for version control
The result? A single Rails app with PostgreSQL, minimal external dependencies, and a codebase you can actually understand and modify.
The Frontend Problem: Why I Almost Chose a JavaScript Framework
When I started Gisia, I faced a common dilemma: build a SPA with React/Vue, or keep it simple?
I chose Rails + Hotwired, and it saved me weeks of development time.
The Problem with Heavy Frontend Frameworks
Most modern Git hosting UIs involve:
Merge request creation and editing
Real-time status updates for CI/CD pipelines
Interactive forms and modals
Live notifications
Traditionally, this means building a JavaScript SPA with:
React/Vue/Svelte + separate frontend codebase
Complex build tools (Webpack, Vite, etc.)
NPM dependency management and lock files
Redux/Zustand/Pinia state management
API contracts to maintain between frontend and backend
With a 20,000+ line codebase, you're managing two codebases instead of one.
Hotwired to the Rescue
Gisia uses Turbo and Stimulus – Rails' secret weapons for modern interactivity without the JavaScript bloat.
Turbo handles navigation and form submissions elegantly:
That's it. A few lines of JavaScript for interactive color picking on label creation. In React? You'd have 50+ lines of hooks and state management.
The result: Gisia's entire JavaScript footprint is tiny. No webpack, no npm dependency hell, just simple, declarative controllers that enhance server-rendered HTML.
Solid Queue: Simplifying Background Jobs for CI/CD
Gisia includes CI/CD pipeline support – running builds, executing jobs, storing artifacts. This traditionally means:
Sidekiq + Redis setup
Complex job retry logic
Deployment headaches
Solid Queue changed everything. It's Rails' new job processing framework, and it's fast.
# app/jobs/ci/build_job.rb
class Ci::BuildJob < ApplicationJob
  queue_as :default

  def perform(build_id)
    build = Ci::Build.find(build_id)
    build.execute!
  end
end
No Redis. No worker processes to manage. Solid Queue uses your existing PostgreSQL database and processes jobs in the background. For Gisia, this means:
CI/CD pipelines run smoothly without extra infrastructure
Job execution is straightforward and debuggable
Scaling is as simple as adding more Rails processes
Compare this to GitLab's architecture where you need separate runner infrastructure, Redis for job queues, and complex coordination. Gisia handles it all with Rails + PostgreSQL.
Rails Architecture: Built for Speed
Here's how Gisia is structured, and why Rails conventions saved me massive amounts of time:
Rails handles this seamlessly. No custom connection logic needed.
Authentication & Authorization
Devise handles user auth. Custom Pundit-style policies handle permissions:
# app/policies/project_policy.rb
class ProjectPolicy
  def update?
    user.namespace.projects.include?(project)
  end
end
Simple, declarative, and testable.
Business Logic in Models and Concerns
Complex operations live in models and concerns, keeping controllers thin and logic organized. In Gisia, the MergeRequest model handles associations, validations, and query scopes directly. Concerns (like MergeRequests::Status and MergeRequests::MergeStatus) handle cross-cutting logic for state transitions and merge behavior. Instance methods encapsulate specific behavior like calculating commit counts.
This approach keeps business logic close to the data where it belongs. Controllers stay thin (under 15 lines per action), and everything is testable on the model without complex setup or service layer indirection.
Real Examples from Gisia
Interactive Label Management
Creating labels with custom colors uses Stimulus controllers for a clean, interactive experience:
// app/javascript/controllers/color_picker_controller.js
import { Controller } from '@hotwired/stimulus'

export default class extends Controller {
  static targets = ['preview']

  updatePreview() {
    const color = this.element.querySelector('input[type="text"]').value
    if (/^#[0-9A-F]{6}$/i.test(color)) {
      this.previewTarget.style.backgroundColor = color
    }
  }

  selectColor(event) {
    event.preventDefault()
    const color = event.target.dataset.colorValue
    const input = this.element.querySelector('input[type="text"]')
    input.value = color
    this.previewTarget.style.backgroundColor = color
  }
}
When a build completes (via Solid Queue jobs), a server-side event will broadcast updates. The browser automatically re-renders. Zero custom JavaScript orchestration needed.
Development Speed: The Real Win
Here's what matters: I built Gisia faster than I could have with any other tech stack.
A simple tech stack removes friction. With Rails, you get everything built-in: database migrations, ORM, testing framework, asset pipeline, background jobs, routing, authentication. You don't need to piece together 10 different libraries or spend days configuring build tools.
Compare this to a JavaScript SPA approach: you'd need to choose a frontend framework, pick a state management solution, configure a build tool (Webpack/Vite), decide on an API structure, set up API authentication, handle CORS, and manage environment variables across frontend and backend. Each decision adds complexity and time.
With Rails, these decisions are already made for you. You can focus on building features instead of configuring tooling. The conventional structure means new developers onboard faster. The opinionated defaults eliminate bikeshedding.
For Gisia specifically, this meant:
Building merge request logic in days instead of weeks
Implementing CI/CD pipelines without wrestling with job queues
Adding interactive features with Stimulus without learning a complex JavaScript framework
Writing tests that actually catch bugs, not fighting test setup
That's the Rails advantage: simplicity and velocity.
The Result
Gisia is a fully-featured Git hosting platform built in Rails 8 with:
User authentication and authorization
Project and namespace management
Merge requests with code review
CI/CD pipelines and builds
Real-time status updates
Interactive UI without heavy frontend frameworks
The entire codebase is maintainable, understandable, and ready for customization. All possible because Rails + Hotwired eliminated the JavaScript complexity that would have bloated the project.
Why Rails is Still the GOAT
Nowadays, people tend to reach for JavaScript frameworks, microservices, or trendy new languages. But Rails has strengths that remain unmatched:
For web applications, nothing is faster than Rails. Period.
For teams, Rails conventions eliminate endless bikeshedding.
For complexity, Rails handles databases, authentication, background jobs, and real-time features seamlessly.
For learning, a Rails codebase teaches you more about web development than 10 JavaScript frameworks.
Gisia proves it. I built a GitLab alternative with:
Minimal JavaScript footprint (no build pipeline overhead)
Minimal external dependencies
Clean, understandable code
Incredible development velocity
If you're building a web app in 2025, don't sleep on Rails. Especially if you're tired of JavaScript complexity.
Try Gisia
If you're interested in personal Git hosting or want to see Rails architecture in action, check out Gisia on GitHub.
Before we dive into the details, I'd like to say that you may don't need a Sidekiq liveness probe if you only get a few Sidekiq instances on production and it's integrated with an error tracking system. Better to keep things simple.
The Issue
The only issue I've encountered on Production about Sidekiq workers not working is the outage of Redis. Sidekiq noticed this but didn't restart, just pending there. It's a good design since lots of companies these days still not using docker.
From the Source Code of Sidekiq, we can see that it catches all the errors, so the Sidekiq process will keep running in the background.
rescue => e
  # ignore all redis/network issues
  logger.error("heartbeat: #{e}")
  # don't lose the counts if there was a network issue
  Processor::PROCESSED.incr(procd)
  Processor::FAILURE.incr(fails)
end
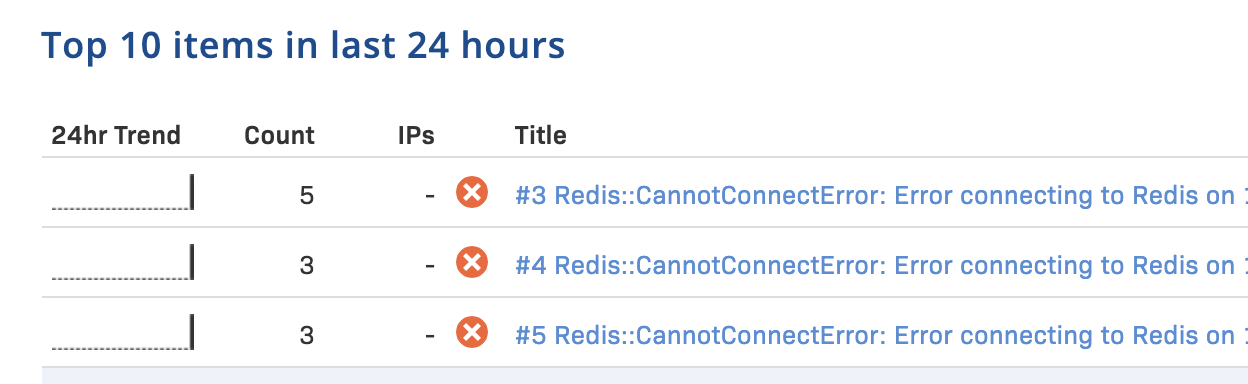
Here are the Sidekiq error messages when Redis server is down.
2020-12-20T10:47:09.966Z pid=12434 tid=6ka ERROR: heartbeat: Error connecting to Redis on 127.0.0.1:6379 (Errno::ECONNREFUSED)
2020-12-20T10:47:44.693Z pid=12434 tid=6jy WARN: Redis::CannotConnectError: Error connecting to Redis on 127.0.0.1:6379 (Errno::ECONNREFUSED)
Solution
The solution is simple, you can just integrate an error tracking service into your project, for example, Rollbar, to log all the errors on production and create an alert message to your Slack channel.
I've tested it on my local, it runs out that Rollbar works well on this kind of thing.
But we can take a further step forward, I'd like to make sure no job will be lost after restart Sidekiq.
How to restart Sidekiq without loosing Jobs
When the job is processing in the background, you should not just kill the Sidekiq process directly, instead we want to restart it gracefully.
System provides Job Signals to interact with background jobs, we call it Job Control, and we can tell the job to stop ingesting new jobs by sending signals.
The SIGTSTP signal is an interactive stop signal. Unlike SIGSTOP, this signal can be handled and ignored.
Your program should handle this signal if you have a special need to leave files or system tables in a secure state when a process is stopped. For example, programs that turn off echoing should handle SIGTSTP so they can turn echoing back on before stopping.
Finally, we get the right signal for stopping the background job, but when we send this signal to Sidekiq. Since I'm using Kubernetes as our pods' management, the following tutorial is about the implementation in K8s.
How to implement Sidekiq Probes In Kubernetes
The first thing about when to send the signal is that we must figure out the Lifecycle of Kubernetes pods termination. It looks like this:
The pod is set to the Terminating State and stop getting new traffic
preStop Hook is executed
SIGTERM signal is sent to the pod
Kubernetes waits for a grace period
SIGKILL signal is sent to the pod, and the pod is removed
To set a gracefully restart, we can send the signal SIGTSTP at #2 stage proStop Hook with a terminationGracePeriodSeconds value to let the processing jobs finally to be done.
spec:
  containers:
    - name: my_app
      image: my_app:latest
      env:
        - name: RAILS_ENV
          value: production
      command:
        - bundle
        - exec
        - sidekiq
      ports:
        - containerPort: 7433
      livenessProbe:
        httpGet:
          path: /
          port: 7433
        initialDelaySeconds: 80 # app specific. Time your sidekiq takes to start processing.
        timeoutSeconds: 5 # can be much less
      readinessProbe:
        httpGet:
          path: /
          port: 7433
        initialDelaySeconds: 80 # app specific
        timeoutSeconds: 5 # can be much less
      lifecycle:
        preStop:
          exec:
            # SIGTERM triggers a quick exit; gracefully terminate instead
            command: ["kube/sidekiq_quiet"]
  terminationGracePeriodSeconds: 60 # put your longest Job time here plus security time.
Please aware that you'd better not run time-consuming jobs, or you may see your Sidekiq pods in Terminating status in a long time.
]]>
Before we dive into the details, I'd like to say that you may don't need a Sidekiq liveness probe if you only get a few Sidekiq instances on production and it's integrated with an error tracking system. Better to keep things simple.
The Issue
The only issue I've encountered on Production about Sidekiq workers not working is the outage of Redis. Sidekiq noticed this but didn't restart, just pending there. It's a good design since lots of companies these days still not using docker.
From the Source Code of Sidekiq, we can see that it catches all the errors, so the Sidekiq process will keep running in the background.
rescue => e
  # ignore all redis/network issues
  logger.error("heartbeat: #{e}")
  # don't lose the counts if there was a network issue
  Processor::PROCESSED.incr(procd)
  Processor::FAILURE.incr(fails)
end
Here are the Sidekiq error messages when Redis server is down.
2020-12-20T10:47:09.966Z pid=12434 tid=6ka ERROR: heartbeat: Error connecting to Redis on 127.0.0.1:6379 (Errno::ECONNREFUSED)
2020-12-20T10:47:44.693Z pid=12434 tid=6jy WARN: Redis::CannotConnectError: Error connecting to Redis on 127.0.0.1:6379 (Errno::ECONNREFUSED)
Solution
The solution is simple, you can just integrate an error tracking service into your project, for example, Rollbar, to log all the errors on production and create an alert message to your Slack channel.
I've tested it on my local, it runs out that Rollbar works well on this kind of thing.
But we can take a further step forward, I'd like to make sure no job will be lost after restart Sidekiq.
How to restart Sidekiq without loosing Jobs
When the job is processing in the background, you should not just kill the Sidekiq process directly, instead we want to restart it gracefully.
System provides Job Signals to interact with background jobs, we call it Job Control, and we can tell the job to stop ingesting new jobs by sending signals.
The SIGTSTP signal is an interactive stop signal. Unlike SIGSTOP, this signal can be handled and ignored.
Your program should handle this signal if you have a special need to leave files or system tables in a secure state when a process is stopped. For example, programs that turn off echoing should handle SIGTSTP so they can turn echoing back on before stopping.
Finally, we get the right signal for stopping the background job, but when we send this signal to Sidekiq. Since I'm using Kubernetes as our pods' management, the following tutorial is about the implementation in K8s.
How to implement Sidekiq Probes In Kubernetes
The first thing about when to send the signal is that we must figure out the Lifecycle of Kubernetes pods termination. It looks like this:
The pod is set to the Terminating State and stop getting new traffic
preStop Hook is executed
SIGTERM signal is sent to the pod
Kubernetes waits for a grace period
SIGKILL signal is sent to the pod, and the pod is removed
To set a gracefully restart, we can send the signal SIGTSTP at #2 stage proStop Hook with a terminationGracePeriodSeconds value to let the processing jobs finally to be done.
spec:
  containers:
    - name: my_app
      image: my_app:latest
      env:
        - name: RAILS_ENV
          value: production
      command:
        - bundle
        - exec
        - sidekiq
      ports:
        - containerPort: 7433
      livenessProbe:
        httpGet:
          path: /
          port: 7433
        initialDelaySeconds: 80 # app specific. Time your sidekiq takes to start processing.
        timeoutSeconds: 5 # can be much less
      readinessProbe:
        httpGet:
          path: /
          port: 7433
        initialDelaySeconds: 80 # app specific
        timeoutSeconds: 5 # can be much less
      lifecycle:
        preStop:
          exec:
            # SIGTERM triggers a quick exit; gracefully terminate instead
            command: ["kube/sidekiq_quiet"]
  terminationGracePeriodSeconds: 60 # put your longest Job time here plus security time.
Please aware that you'd better not run time-consuming jobs, or you may see your Sidekiq pods in Terminating status in a long time.
]]>2020-12-21T22:40:28-06:00Martin Tan<![CDATA[Days Off-set at Chengdu WeWork]]>https://mrtan.me/post/days-off-set-at-chengdu-wework.htmlDays before the Chinese Spring Festival of 2020, I traveled to Chengdu city to avoid the annual travel peak. I'd like to thanks WeWork's policy to allow me to work remotely. Daily syncing goes really well on Slack and Wechat as what we always did in HQ. While keeping work on the track, it's also a good opportunity for me to visit some locations of WeWork in Chengdu.
Lobby of Pinnacle One
That morning, the sun just raise to the top-right corn of the glass wall, which gives me a very strong implicit feel that I'm in a scenario of Blade Runner.
Pantry of 40th floor
It's a sunny day for local people, but the air was not clear, not only due to air pollution, but fog. From a famous proverb, dogs at Sichuan bark the sun (蜀犬吠日 in Chinese), you can get it. This proverb is a sarcasm that dogs here do not have much time to see the sun. Chengdu is located at the Sichuan plain and rounded by high mountains, it‘s foggy especially in winter.
Even after years of high speed developing, still lots of spots remaining there as indicators of traditional local culture.
I found a peaceful zen view sitting at a corner of the main round when I was out for lunch on the first day. A slim and long tree and a grey wall, the shadow of the tree was waving on the wall when the wind breezed through. I was wondering why there is such a stylized building in this commercial district, it should be a patthana, I found Daci Temple (大慈寺 in Chinese) the day after.
Daci Temple, which was destroyed and rebuilt several times in history, was founded by an Indian monk about 1600 years ago. But event today, it still has a strong vitality rooted in the local community. I saw many people pray for blessings at the temple and found some modernized gallery photos on a wall, all these are signs.
The zen of East Asia temples are built internally, you don't have to look for it, it's always there.
But, skyscrapers are rising, I can see the conflicts between a modern world and a traditional society. Hopes are still there.
]]>Days before the Chinese Spring Festival of 2020, I traveled to Chengdu city to avoid the annual travel peak. I'd like to thanks WeWork's policy to allow me to work remotely. Daily syncing goes really well on Slack and Wechat as what we always did in HQ. While keeping work on the track, it's also a good opportunity for me to visit some locations of WeWork in Chengdu.
Lobby of Pinnacle One
That morning, the sun just raise to the top-right corn of the glass wall, which gives me a very strong implicit feel that I'm in a scenario of Blade Runner.
Pantry of 40th floor
It's a sunny day for local people, but the air was not clear, not only due to air pollution, but fog. From a famous proverb, dogs at Sichuan bark the sun (蜀犬吠日 in Chinese), you can get it. This proverb is a sarcasm that dogs here do not have much time to see the sun. Chengdu is located at the Sichuan plain and rounded by high mountains, it‘s foggy especially in winter.
Even after years of high speed developing, still lots of spots remaining there as indicators of traditional local culture.
I found a peaceful zen view sitting at a corner of the main round when I was out for lunch on the first day. A slim and long tree and a grey wall, the shadow of the tree was waving on the wall when the wind breezed through. I was wondering why there is such a stylized building in this commercial district, it should be a patthana, I found Daci Temple (大慈寺 in Chinese) the day after.
Daci Temple, which was destroyed and rebuilt several times in history, was founded by an Indian monk about 1600 years ago. But event today, it still has a strong vitality rooted in the local community. I saw many people pray for blessings at the temple and found some modernized gallery photos on a wall, all these are signs.
The zen of East Asia temples are built internally, you don't have to look for it, it's always there.
But, skyscrapers are rising, I can see the conflicts between a modern world and a traditional society. Hopes are still there.
]]>2020-01-22T14:27:00-06:00Martin Tan<![CDATA[RabbittMQ Dealing with Failure]]>https://mrtan.me/post/rabbittmq-dealing-with-failure.html
Goal
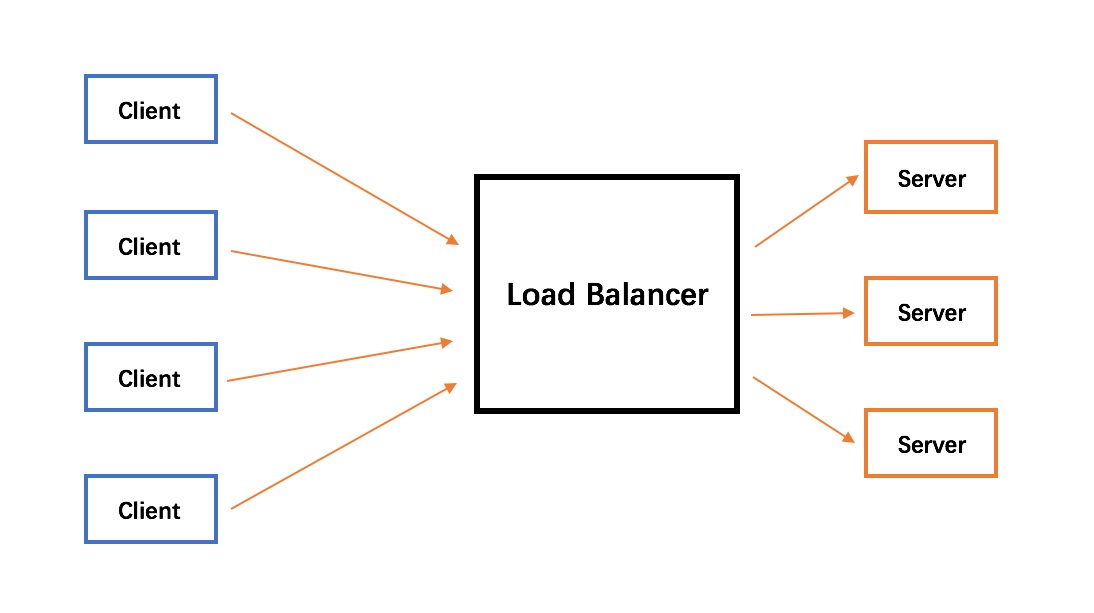
To figure out a sample, but an implementable way of handling RabbitMQ failure. We are going to set up a RabbitMQ cluster on your local device with HAProxy as a load balancer, and synchronizing queues between different RabbitMQ nodes will also be included.
Setup Environment
In this post, I'm going to use Ubuntu 18.04.3 LTS and going to build RabbitMQ and HAProxy from the source package with the latest version.
Ruby is the programming language for the following examples.
I'm not going to use the docker images which are ready on Docker hub. This time we can do it step by step to see how it works.
As described on the document, bunny is easy to use, feature-complete Ruby client for RabbitMQ.
sudo apt -y install ruby
sudo gem install bunny
Install Erlang
Erlang, the programming language that Ericsson had originally developed for their telephone switching gear. What grabbed Matthias’s attention was that Erlang excelled at distributed programming and robust failure recovery.
RabbitMQ in Action: Distributed Messaging for Everyone
Book by Alvaro Videla and Jason J. W. Williams
RabbitMQ is written by Erlang, also has the advantages of Erlang.
wget http://erlang.org/download/otp_src_22.2.tar.gz
tar -zxf otp_src_22.2.tar.gz
cd otp_src_22.2
export ERL_TOP=`pwd`
./configure
make
sudo make install
Install RabbitMQ
Thanks to Erlang VM, we don't need to rebuild the package, we can use RabbitMQ after unpacking it.
cd ~
wget https://github.com/rabbitmq/rabbitmq-server/releases/download/v3.8.2/rabbitmq-server-generic-unix-3.8.2.tar.xz
tar -xf rabbitmq-server-generic-unix-3.8.2.tar.xz
cd rabbitmq_server-3.8.2
Install HAProxy
# Install HAProxy
wget http://www.haproxy.org/download/2.1/src/haproxy-2.1.2.tar.gz
tar xfz haproxy-2.1.2.tar.gz
cd haproxy-2.1.
make clean
make -j $(nproc) TARGET=linux-glibc
sudo make install
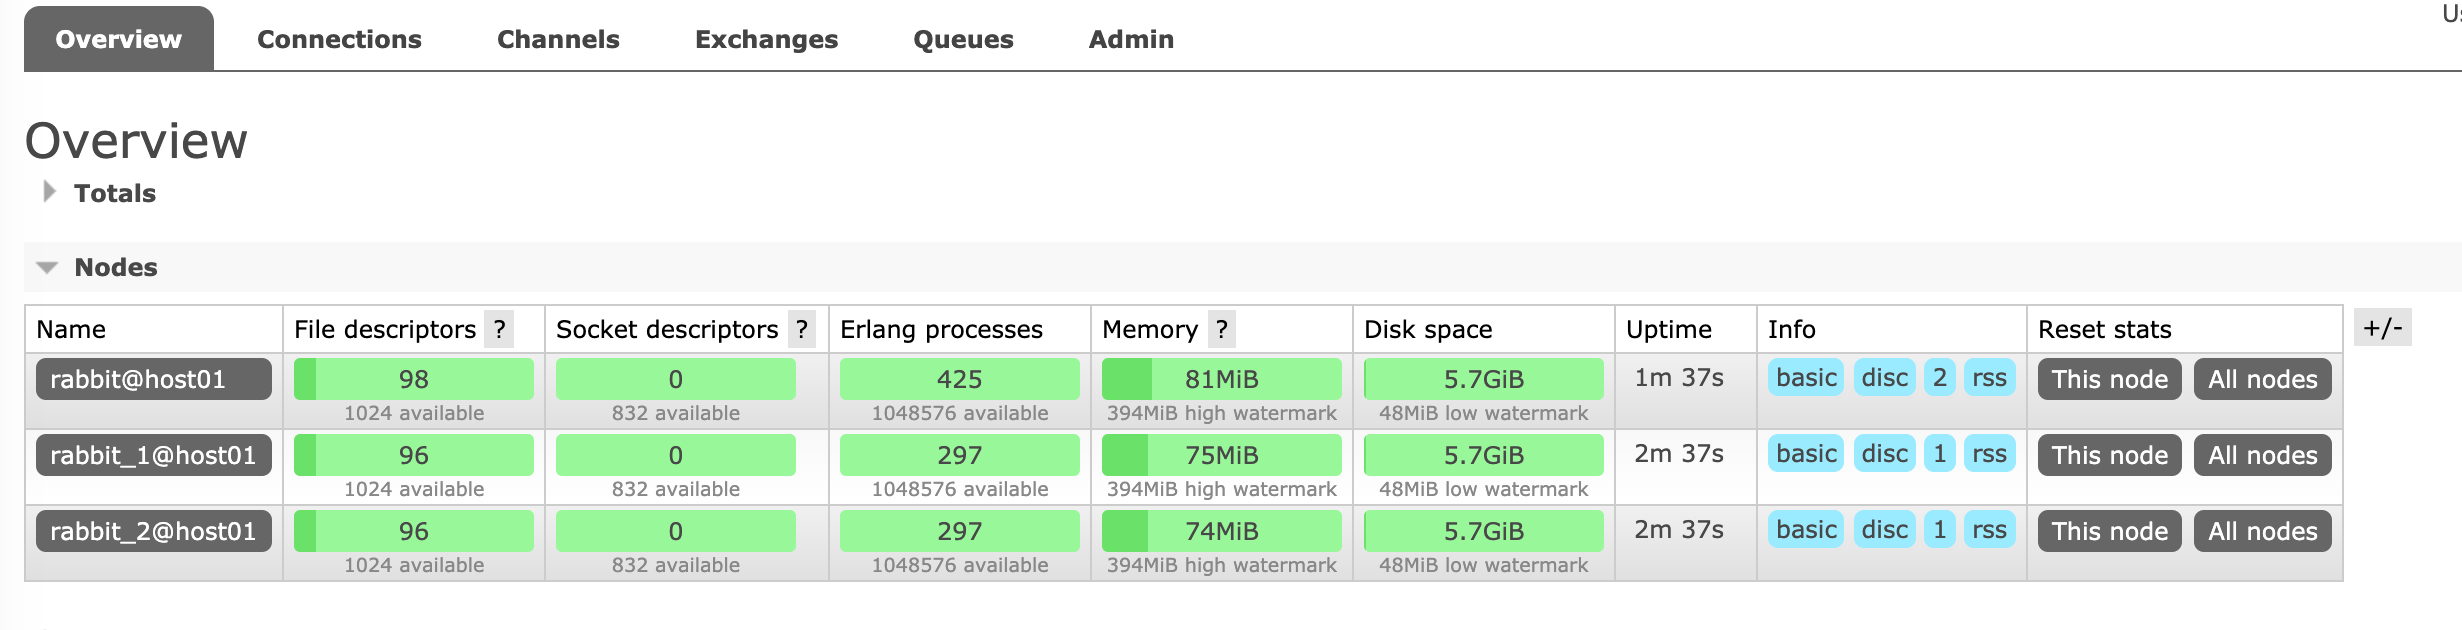
Setup RabbitMQ Cluster
Pull Up Servers
First, we should create pull up three RabbitMQ servers in the background, and each one has its port.
After the management enabled on the first node, we can access the dashboard by open http://localhost:15672/#/, or by running a command line ./sbin/rabbitmqctl cluster_status.
If you do not visit the dashboard from localhost, you should setup a new user for remote access.
# set a new user
./sbin/rabbitmqctl add_user test test
./sbin/rabbitmqctl set_user_tags test administrator
./sbin/rabbitmqctl set_permissions -p / test ".*" ".*" ".*"
All RabbitMQ nodes are up and running well in a cluster.
RabbitMQ HAProxy Load Balance
HAProxy Configuration
Here is an example of my local HAProxy configuration for three RabbitMQ nodes.
global
    log 127.0.0.1   local0
    log 127.0.0.1   local1 notice
    maxconn 4096

defaults
    log global
    option tcplog
    option  dontlognull
    timeout connect 6s
    timeout client 60s
    timeout server 60s

listen  stats
    bind *:9000
    mode http
    option httplog
    stats enable
    stats hide-version
    stats realm Haproxy\ Statistics
    stats uri /

listen rabbitmq
    bind *:1999
    mode tcp
    option tcplog
    log stdout format raw daemon debug
    balance leastconn
    server rabbitmq localhost:5672 check
    server rabbitmq-01 localhost:5673 check
    server rabbitmq-02 localhost:5674 check
Now, you can run the haproxy with the configuration file you created.
#!/usr/bin/env ruby
require 'bunny'

connection = Bunny.new
connection.start

channel = connection.create_channel
queue = channel.queue('hello', :durable => true)

begin
  puts ' [*] Waiting for messages. To exit press CTRL+C'
  # block: true is only used to keep the main thread
  # alive. Please avoid using it in real world applications.
  queue.subscribe(block: true) do |_delivery_info, _properties, body|
    puts " [x] Received #{body}"
  end
rescue Interrupt => _
  connection.close

  exit(0)
end
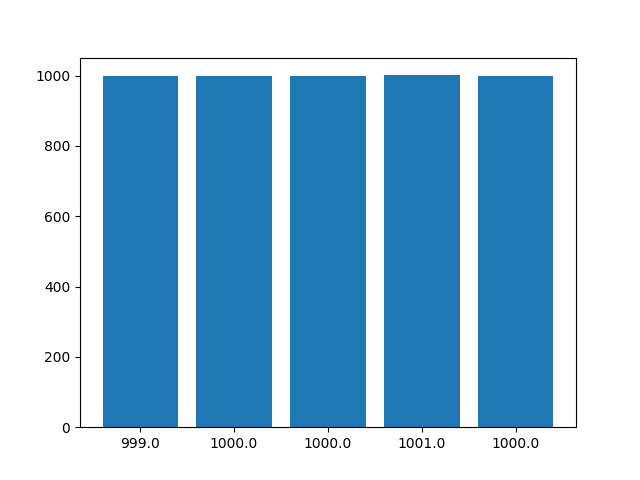
Load Balance Example
Step 1, send messages
Step 2, view HAProxy logs
We can see that the load balancer is working very well, the connections are distributed to all three nodes, rabbitmq, rabbitmq-01 and rabbitmq-02.
Mirrored Queues
In the case above, the messages of that queue are stored on only one node whose name is rabbitmq. The queue will be unavailable if that node is down. But if we mirror the queues which we want to, the messages will be always available, even only one node left.
command
# List queues
./sbin/rabbitmqctl -n rabbit_2@host01 list_queues name policy pid slave_pids synchronised_slave_pids
output
vagrant@host01:~/rabbitmq_server-3.8.2$ ./sbin/rabbitmqctl -n rabbit_2@host01 list_queues name policy pid slave_pids synchronised_slave_pids

Timeout: 60.0 seconds ...
Listing queues for vhost / ...
name    policy  pid slave_pids  synchronised_slave_pids
hello       <rabbit_1@host01.1.3543.0>
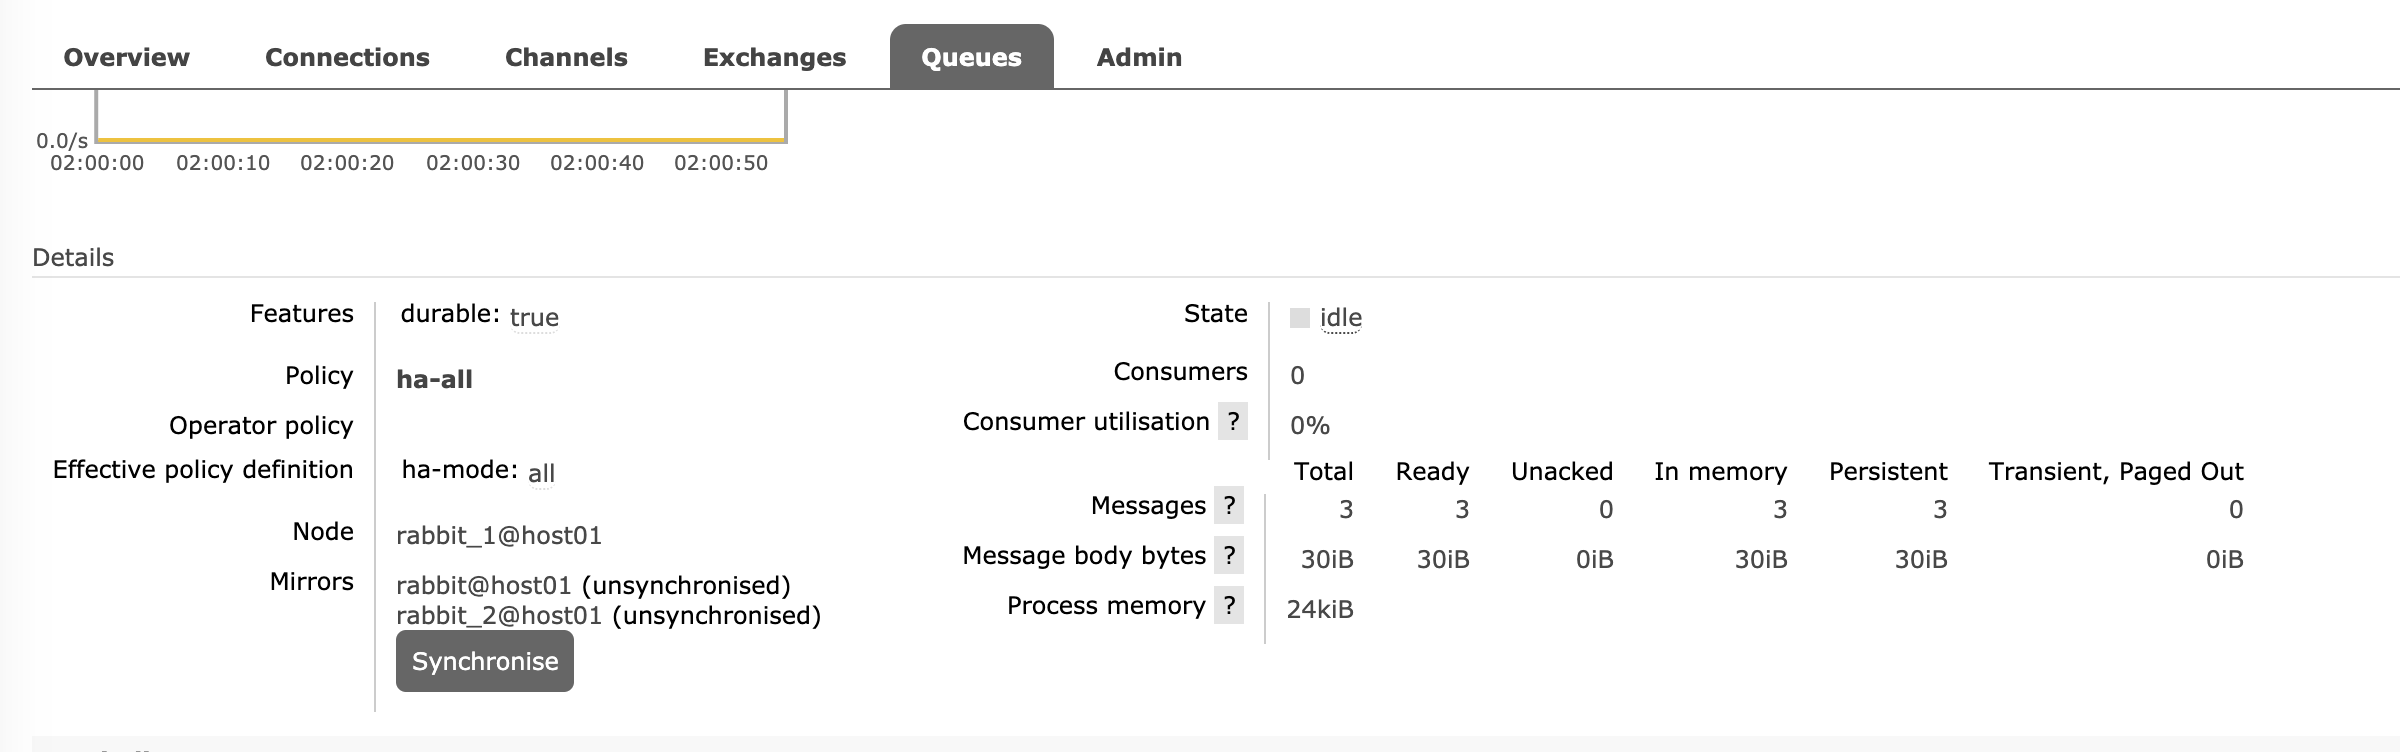
Enable Queue Mirror
The following command will set all the queues with names started with hello to be mirrored. I'm very pleased to see the pattern that supports regex.
From what i know, this feature of declaring queue with policy is not supported in the latest version of rabbitmq. The follow code will not be working.
vagrant@host01:~/rabbitmq_server-3.8.2$ ./sbin/rabbitmqctl set_policy ha-all "^hello" '{"ha-mode":"all"}'
Setting policy "ha-all" for pattern "^hello" to "{"ha-mode":"all"}" with priority "0" for vhost "/" ...
now we can see the queue is mirrored with the other two nodes, but the messages are not synced between nodes, you can run commandline ./sbin/rabbitmqctl sync_queue hello or just click the button Synchronise on RabbitMQ dashboard.
Under this condition, the consumer client won't encounter any errors with nodes failure. The messages will be published and consumed smoothly.
Recovery from Error on Code Level
If you are using docker, you can set up your own policy for failure restart, also you can do it only code level as you like.
Here is the pseudo-code of how to handle it on language level by using rescue or catch.
def consume
  begin
    do_something_with_bunny
  rescue => e
    logger.error e
    do_something_with_bunny
  end
end
Coming to conclusion, we have addressed four strategies on how to handle RabbitMQ failure.
Using RabbitMQ Cluster to enable capacity.
Using load balance to improve availability.
Using mirrored queue to higher the durability.
Using code error handler to improve the elasticity.
References
Cover image from https://pixabay.com/vectors/rabbit-character-alice-in-wonderland-30751/
]]>
Goal
To figure out a sample, but an implementable way of handling RabbitMQ failure. We are going to set up a RabbitMQ cluster on your local device with HAProxy as a load balancer, and synchronizing queues between different RabbitMQ nodes will also be included.
Setup Environment
In this post, I'm going to use Ubuntu 18.04.3 LTS and going to build RabbitMQ and HAProxy from the source package with the latest version.
Ruby is the programming language for the following examples.
I'm not going to use the docker images which are ready on Docker hub. This time we can do it step by step to see how it works.
As described on the document, bunny is easy to use, feature-complete Ruby client for RabbitMQ.
sudo apt -y install ruby
sudo gem install bunny
Install Erlang
Erlang, the programming language that Ericsson had originally developed for their telephone switching gear. What grabbed Matthias’s attention was that Erlang excelled at distributed programming and robust failure recovery.
RabbitMQ in Action: Distributed Messaging for Everyone
Book by Alvaro Videla and Jason J. W. Williams
RabbitMQ is written by Erlang, also has the advantages of Erlang.
wget http://erlang.org/download/otp_src_22.2.tar.gz
tar -zxf otp_src_22.2.tar.gz
cd otp_src_22.2
export ERL_TOP=`pwd`
./configure
make
sudo make install
Install RabbitMQ
Thanks to Erlang VM, we don't need to rebuild the package, we can use RabbitMQ after unpacking it.
cd ~
wget https://github.com/rabbitmq/rabbitmq-server/releases/download/v3.8.2/rabbitmq-server-generic-unix-3.8.2.tar.xz
tar -xf rabbitmq-server-generic-unix-3.8.2.tar.xz
cd rabbitmq_server-3.8.2
Install HAProxy
# Install HAProxy
wget http://www.haproxy.org/download/2.1/src/haproxy-2.1.2.tar.gz
tar xfz haproxy-2.1.2.tar.gz
cd haproxy-2.1.
make clean
make -j $(nproc) TARGET=linux-glibc
sudo make install
Setup RabbitMQ Cluster
Pull Up Servers
First, we should create pull up three RabbitMQ servers in the background, and each one has its port.
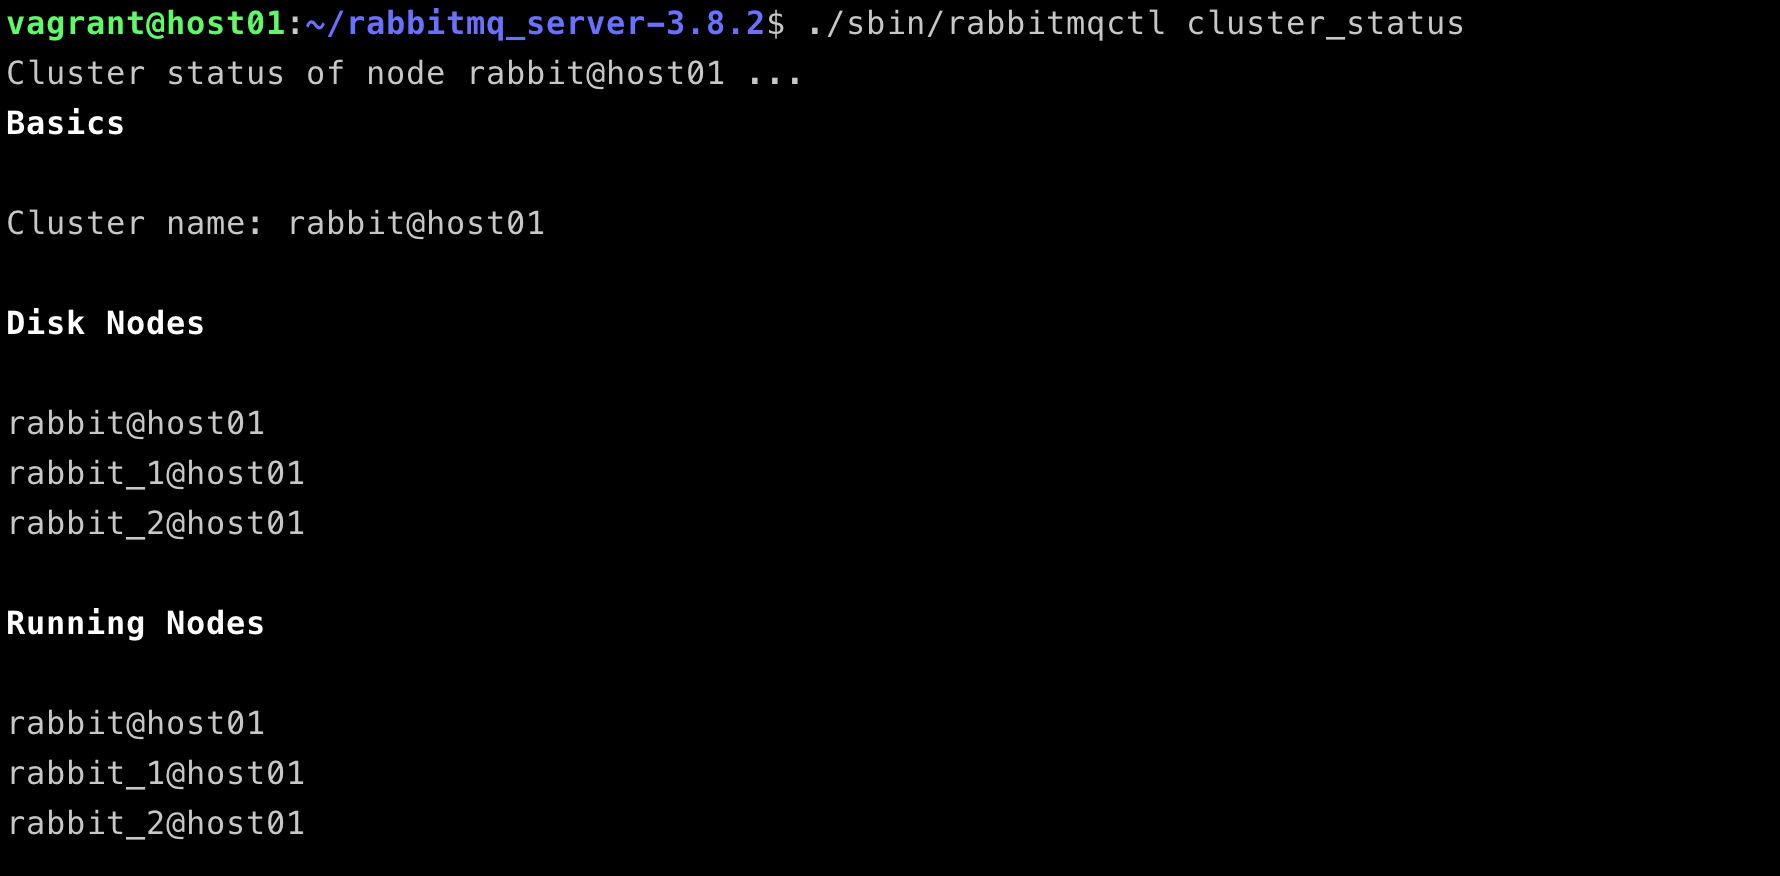
After the management enabled on the first node, we can access the dashboard by open http://localhost:15672/#/, or by running a command line ./sbin/rabbitmqctl cluster_status.
If you do not visit the dashboard from localhost, you should setup a new user for remote access.
# set a new user
./sbin/rabbitmqctl add_user test test
./sbin/rabbitmqctl set_user_tags test administrator
./sbin/rabbitmqctl set_permissions -p / test ".*" ".*" ".*"
All RabbitMQ nodes are up and running well in a cluster.
RabbitMQ HAProxy Load Balance
HAProxy Configuration
Here is an example of my local HAProxy configuration for three RabbitMQ nodes.
global
    log 127.0.0.1   local0
    log 127.0.0.1   local1 notice
    maxconn 4096

defaults
    log global
    option tcplog
    option  dontlognull
    timeout connect 6s
    timeout client 60s
    timeout server 60s

listen  stats
    bind *:9000
    mode http
    option httplog
    stats enable
    stats hide-version
    stats realm Haproxy\ Statistics
    stats uri /

listen rabbitmq
    bind *:1999
    mode tcp
    option tcplog
    log stdout format raw daemon debug
    balance leastconn
    server rabbitmq localhost:5672 check
    server rabbitmq-01 localhost:5673 check
    server rabbitmq-02 localhost:5674 check
Now, you can run the haproxy with the configuration file you created.
#!/usr/bin/env ruby
require 'bunny'

connection = Bunny.new
connection.start

channel = connection.create_channel
queue = channel.queue('hello', :durable => true)

begin
  puts ' [*] Waiting for messages. To exit press CTRL+C'
  # block: true is only used to keep the main thread
  # alive. Please avoid using it in real world applications.
  queue.subscribe(block: true) do |_delivery_info, _properties, body|
    puts " [x] Received #{body}"
  end
rescue Interrupt => _
  connection.close

  exit(0)
end
Load Balance Example
Step 1, send messages
Step 2, view HAProxy logs
We can see that the load balancer is working very well, the connections are distributed to all three nodes, rabbitmq, rabbitmq-01 and rabbitmq-02.
Mirrored Queues
In the case above, the messages of that queue are stored on only one node whose name is rabbitmq. The queue will be unavailable if that node is down. But if we mirror the queues which we want to, the messages will be always available, even only one node left.
command
# List queues
./sbin/rabbitmqctl -n rabbit_2@host01 list_queues name policy pid slave_pids synchronised_slave_pids
output
vagrant@host01:~/rabbitmq_server-3.8.2$ ./sbin/rabbitmqctl -n rabbit_2@host01 list_queues name policy pid slave_pids synchronised_slave_pids

Timeout: 60.0 seconds ...
Listing queues for vhost / ...
name    policy  pid slave_pids  synchronised_slave_pids
hello       <rabbit_1@host01.1.3543.0>
Enable Queue Mirror
The following command will set all the queues with names started with hello to be mirrored. I'm very pleased to see the pattern that supports regex.
From what i know, this feature of declaring queue with policy is not supported in the latest version of rabbitmq. The follow code will not be working.
vagrant@host01:~/rabbitmq_server-3.8.2$ ./sbin/rabbitmqctl set_policy ha-all "^hello" '{"ha-mode":"all"}'
Setting policy "ha-all" for pattern "^hello" to "{"ha-mode":"all"}" with priority "0" for vhost "/" ...
now we can see the queue is mirrored with the other two nodes, but the messages are not synced between nodes, you can run commandline ./sbin/rabbitmqctl sync_queue hello or just click the button Synchronise on RabbitMQ dashboard.
Under this condition, the consumer client won't encounter any errors with nodes failure. The messages will be published and consumed smoothly.
Recovery from Error on Code Level
If you are using docker, you can set up your own policy for failure restart, also you can do it only code level as you like.
Here is the pseudo-code of how to handle it on language level by using rescue or catch.
def consume
  begin
    do_something_with_bunny
  rescue => e
    logger.error e
    do_something_with_bunny
  end
end
Coming to conclusion, we have addressed four strategies on how to handle RabbitMQ failure.
Using RabbitMQ Cluster to enable capacity.
Using load balance to improve availability.
Using mirrored queue to higher the durability.
Using code error handler to improve the elasticity.
References
Cover image from https://pixabay.com/vectors/rabbit-character-alice-in-wonderland-30751/
]]>2020-01-20T11:31:31-06:00Martin Tan<![CDATA[Java RGB to CMYK Converter]]>https://mrtan.me/post/java-rgb-to-cmyk-converter.html
As we already talked about the implementation of how to convert a color pixel value from RGB to CMYK, now I'd like to show you how to convert it from CMYK to RGB.
Question
RGB to CMYK color matching. Write a java program RGBtoCMYK that reads in four command line inputs R, G, B between 0 and 255, and prints the corresponding CMYK values. Devise the appropriate formula by "inverting" the CMYK to RGB conversion formula.
Implementing Steps
The CMYK color model has 4 color values from 0 to 100, and the RGB color model has 3 color values from 0 to 255. The formula is very simple and listed in the code.
Here is the formula
R' = R/255

G' = G/255

B' = B/255

K = 1-max(R', G', B')

C = (1-R'-K) / (1-K)

M = (1-G'-K) / (1-K)

Y = (1-B'-K) / (1-K)
Here the goes the key steps:
Pass 3 values matching R, G, B
Calculate the CMYK values according to the RGB values
Print the CMYK values as String
Solution
/******************************************************************************
 *  Compilation:  javac RgbCmykConverter.java
 *  Execution:    java RgbCmykConverter R G B
 *
 *  Convert color values from RGB to CMYK format.
 *
 *  %  java RgbCmykConverter 0 0 0
 *  [0, 0, 0, 100]
 *
 *  %  java RgbCmykConverter 255 0 0
 *  [0, 100, 100, 0]
 *
 *  %  java RgbCmykConverter 0 0 255
 *  [100, 100, 0, 0]
 *
 ******************************************************************************/

import java.util.Arrays;

public class RgbCmykConverter {
    public static void main(String[] args) {
        int[] cmyk = rgbToCmyk(
            Integer.parseInt(args[0]),
            Integer.parseInt(args[1]),
            Integer.parseInt(args[2])
        );

        System.out.println(Arrays.toString(cmyk));
    }

    private static int[] rgbToCmyk(int r, int g, int b) {
        double percentageR = r / 255.0 * 100;
        double percentageG = g / 255.0 * 100;
        double percentageB = b / 255.0 * 100;

        double k = 100 - Math.max(Math.max(percentageR, percentageG), percentageB);

        if (k == 100) {
            return new int[]{ 0, 0, 0, 100 };
        }

        int c = (int)((100 - percentageR - k) / (100 - k) * 100);
        int m = (int)((100 - percentageG - k) / (100 - k) * 100);
        int y = (int)((100 - percentageB - k) / (100 - k) * 100);

        return new int[]{ c, m, y, (int)k };
    }
}
The code above is a very simple java code of how to convert a pixel color value from RGB to CMYK.
]]>
As we already talked about the implementation of how to convert a color pixel value from RGB to CMYK, now I'd like to show you how to convert it from CMYK to RGB.
Question
RGB to CMYK color matching. Write a java program RGBtoCMYK that reads in four command line inputs R, G, B between 0 and 255, and prints the corresponding CMYK values. Devise the appropriate formula by "inverting" the CMYK to RGB conversion formula.
Implementing Steps
The CMYK color model has 4 color values from 0 to 100, and the RGB color model has 3 color values from 0 to 255. The formula is very simple and listed in the code.
Here is the formula
R' = R/255

G' = G/255

B' = B/255

K = 1-max(R', G', B')

C = (1-R'-K) / (1-K)

M = (1-G'-K) / (1-K)

Y = (1-B'-K) / (1-K)
Here the goes the key steps:
Pass 3 values matching R, G, B
Calculate the CMYK values according to the RGB values
Print the CMYK values as String
Solution
/******************************************************************************
 *  Compilation:  javac RgbCmykConverter.java
 *  Execution:    java RgbCmykConverter R G B
 *
 *  Convert color values from RGB to CMYK format.
 *
 *  %  java RgbCmykConverter 0 0 0
 *  [0, 0, 0, 100]
 *
 *  %  java RgbCmykConverter 255 0 0
 *  [0, 100, 100, 0]
 *
 *  %  java RgbCmykConverter 0 0 255
 *  [100, 100, 0, 0]
 *
 ******************************************************************************/

import java.util.Arrays;

public class RgbCmykConverter {
    public static void main(String[] args) {
        int[] cmyk = rgbToCmyk(
            Integer.parseInt(args[0]),
            Integer.parseInt(args[1]),
            Integer.parseInt(args[2])
        );

        System.out.println(Arrays.toString(cmyk));
    }

    private static int[] rgbToCmyk(int r, int g, int b) {
        double percentageR = r / 255.0 * 100;
        double percentageG = g / 255.0 * 100;
        double percentageB = b / 255.0 * 100;

        double k = 100 - Math.max(Math.max(percentageR, percentageG), percentageB);

        if (k == 100) {
            return new int[]{ 0, 0, 0, 100 };
        }

        int c = (int)((100 - percentageR - k) / (100 - k) * 100);
        int m = (int)((100 - percentageG - k) / (100 - k) * 100);
        int y = (int)((100 - percentageB - k) / (100 - k) * 100);

        return new int[]{ c, m, y, (int)k };
    }
}
The code above is a very simple java code of how to convert a pixel color value from RGB to CMYK.
]]>2019-10-30T00:06:20-06:00Martin Tan<![CDATA[Java CMYK to RGB Converter]]>https://mrtan.me/post/java-cmyk-to-rgb-converter.html
Almost everyone knows the RGB color model, red, green and blue, especially as a software engineer. It's widely applied in many industries. The CMYK, stands for "Cyan Magenta Yellow Black", is mostly used in paper print. Today we are going to create a java program to convert a color from CMYK to RGB.
Question
CMYK to RGB color matching. Write a java program CMYKtoRGB that reads in four command line inputs C, M, Y, and K between 0 and 100, and prints the corresponding RGB parameters. Devise the appropriate formula by "inverting" the RGB to CMYK conversion formula.
Implementing Steps
The CMYK color model has 4 color values from 0 to 100, and the RGB color model has 3 color values from 0 to 255. The formula is very simple and listed in the code.
Here is the formula
R = 255 × (1-C) × (1-K)
G = 255 × (1-M) × (1-K)
B = 255 × (1-Y) × (1-K)
Here the goes the key steps:
Pass 4 CMYK values as command line parameters
Calculate the RGB values according to the CMYK values
Print the RGB values as String
Solution
/******************************************************************************
 *  Compilation:  javac CmykRgbConverter.java
 *  Execution:    java CmykRgbConverter c m y k
 *
 *  Convert color values from CMYK to RGB format.
 *
 *  %  java CmykRgbConverter 0 0 0 0
 *  [255, 255, 255]
 *
 *  %  java CmykRgbConverter 0 0 0 100
 *  [0, 0, 0]
 *
 *  %  java CmykRgbConverter 100 0 100 0
 *  [0, 255, 0]
 *
 ******************************************************************************/

import java.util.Arrays;

public class CmykRgbConverter {
    public static void main(String[] args) {
        int[] rgb = cmykToRgb(
            Integer.parseInt(args[0]),
            Integer.parseInt(args[1]),
            Integer.parseInt(args[2]),
            Integer.parseInt(args[3])
        );

        System.out.println(Arrays.toString(rgb));
    }

    private static int[] cmykToRgb(int c, int m, int y, int k) {
        int r = 255 * (1 - c/100) * (1 - k/100);
        int g = 255 * (1 - m/100) * (1 - k/100);
        int b = 255 * (1 - y/100) * (1 - k/100);
        int[] rgb = new int[]{ r, g, b };

        return rgb;
    }
}
The code above is a very simple java code of how to convert a pixel color value from CMYK to RGB.
]]>
Almost everyone knows the RGB color model, red, green and blue, especially as a software engineer. It's widely applied in many industries. The CMYK, stands for "Cyan Magenta Yellow Black", is mostly used in paper print. Today we are going to create a java program to convert a color from CMYK to RGB.
Question
CMYK to RGB color matching. Write a java program CMYKtoRGB that reads in four command line inputs C, M, Y, and K between 0 and 100, and prints the corresponding RGB parameters. Devise the appropriate formula by "inverting" the RGB to CMYK conversion formula.
Implementing Steps
The CMYK color model has 4 color values from 0 to 100, and the RGB color model has 3 color values from 0 to 255. The formula is very simple and listed in the code.
Here is the formula
R = 255 × (1-C) × (1-K)
G = 255 × (1-M) × (1-K)
B = 255 × (1-Y) × (1-K)
Here the goes the key steps:
Pass 4 CMYK values as command line parameters
Calculate the RGB values according to the CMYK values
Print the RGB values as String
Solution
/******************************************************************************
 *  Compilation:  javac CmykRgbConverter.java
 *  Execution:    java CmykRgbConverter c m y k
 *
 *  Convert color values from CMYK to RGB format.
 *
 *  %  java CmykRgbConverter 0 0 0 0
 *  [255, 255, 255]
 *
 *  %  java CmykRgbConverter 0 0 0 100
 *  [0, 0, 0]
 *
 *  %  java CmykRgbConverter 100 0 100 0
 *  [0, 255, 0]
 *
 ******************************************************************************/

import java.util.Arrays;

public class CmykRgbConverter {
    public static void main(String[] args) {
        int[] rgb = cmykToRgb(
            Integer.parseInt(args[0]),
            Integer.parseInt(args[1]),
            Integer.parseInt(args[2]),
            Integer.parseInt(args[3])
        );

        System.out.println(Arrays.toString(rgb));
    }

    private static int[] cmykToRgb(int c, int m, int y, int k) {
        int r = 255 * (1 - c/100) * (1 - k/100);
        int g = 255 * (1 - m/100) * (1 - k/100);
        int b = 255 * (1 - y/100) * (1 - k/100);
        int[] rgb = new int[]{ r, g, b };

        return rgb;
    }
}
Fibonacci Word means the next word is concatenated up by the two words before it.
Sn = S(n-1) · S(n-2)
0
01
010
01001
Question
Write a program FibonacciWord.java that prints the Fibonacci word of order 0 through 10. f(0) = "a", f(1) = "b", f(2) = "ba", f(3) = "bab", f(4) = "babba", and in general f(n) = f(n-1) followed by f(n-2). Use string concatenation.
Implementing Steps
First of all, we are going to define two base words 0 and 01, and pass a length n as the parameter. Then, we can use a for loop to go through each word and use a temp variable as a swap place to help to forward the two variables of base words.
Here the goes the key steps:
There two variables wordN, wordN_1 for S(n) and S(n-1)
There a variable temp for exchanging values
Loop N times
Return the last value
Solution
/******************************************************************************
 *  Compilation:  javac FibonacciWord.java
 *  Execution:    java FibonacciWord n
 *
 *  Prints the Fibonacci word of f(n) = f(n-1) followed by f(n-2).
 *
 *  % java FibonacciWord 3
 *  01001
 *  % java FibonacciWord 4
 *  01001010
 *
 ******************************************************************************/

public class FibonacciWord {
    private static String fibWord(int n) {
        String wordN = "01";
        String wordN_1 = "0";
        String temp;

        for (int i = 2; i <= n; i++) {
            temp = wordN;
            wordN += wordN_1;
            wordN_1 = temp;
        }

        return wordN;
    }

    public static void main(String[] args) {
        int n = Integer.parseInt(args[0]);
        System.out.println(fibWord(n));
    }
}
]]>2019-10-29T22:12:09-06:00Martin Tan<![CDATA[Rails on Kubernetes Deployment Tutorial]]>https://mrtan.me/post/37.htmlKubernetes is different from Docker Swarm, it has Pods and running Containers inside Pods. Here is a simplified Kubernetes architecture diagram. In this tutorial, we are going to go through all the steps from setup Kubernetes on your local device to run Rails on a local Kubernetes cluster.
Activate Kubernetes Support on Docker for Mac
Using Docker App is a very common way for engineers to run and debug Kubernetes on local devices. You can enable Kubernetes by clicking on the checkbox.
Let's make sure we already connected to the Docker-Desktop, please set up the config first if it's not. Each context has its namespaces and users.
➜  ~ kubectl config get-contexts
CURRENT   NAME                 CLUSTER                      AUTHINFO             NAMESPACE
*         docker-for-desktop   docker-for-desktop-cluster   docker-for-desktop
          minikube             minikube                     minikube

➜  ~ kubectl config use-context docker-for-desktop
Switched to context "docker-for-desktop".
Create a Rails Project
Rails New
First of all, if you don't get any Rails project on your hand, create a new one. Since we don't need run Rails on the host machine, just skip installing Gem packages by adding --skip-bundle.
rails new rails-on-kube --skip-bundle
Create Docker Entypoint
Once you get a Rails project created, touch a docker entry point file docker-entrypoint.sh.
To build a docker image, we need to create a Dockerfile at the project root directory.
FROM ruby:2.6.0-alpine

RUN apk --update add build-base tzdata git \
    libxslt-dev libxml2-dev openssl \
    sqlite-dev yarn\
    && rm -rf /var/cache/apk/*
RUN gem install bundler

ENV RAILS_ROOT /var/www
WORKDIR $RAILS_ROOT

COPY Gemfile* ./

ENV RAILS_ENV=production

RUN bundle install --jobs 10 --retry 5 --without development test
RUN rails webpacker:install

COPY . .

RUN chmod u+x docker-entrypoint.sh
CMD ["sh", "docker-entrypoint.sh"]
Build Project Image
Now, we come to the last steps of creating a Rails project image. Paste and run the following command, a new Docker image will be available on your local.
docker build -f Dockerfile -t rails-on-kube .
Setup Kubernetes for Rails
Finally, we reach the last part of setting up Kubernetes. We should keep in mind, every object in a Kubernetes context can be considered as a resource, each resource can be defined by a YAML file.
To keep this tutorial clear and sample, we only need one resource YAML file, here we go.
Create Kubernetes Resource File
Filename rails-on-kube.yaml
In this file, we are going to deploy a Rails service based on the docker image we built before. imagePullPolicy: Never means using local images, or you may get an image Not-Found-Error.
replicas: 2 means there is going to have two replicas of the Rails service.
The two main functions of Deployment Yaml is to declare pods and setup replicas.
The last step is using kubectl apply to update the Kubernetes cluster to match the descriptions from a YAML file. Then, exposes an external IP address, so we can access the service.
I also got some extra command lines of Kubernetes for you to debug.
Debugging and Logging
# Get the detail of pods
kubectl describe pods

# Get the info of a service
kubectl get services rails-service
Exec Command in Container
# Show all service pods you created
kubectl get pods

# Exec sh in a pod
kubectl exec -it my-app-64d75bd9d9-8nlfk -- sh

# Show logs of a pod
kubectl logs rails-app-5897fdc7b8-dhvj6
In addition, it's better to use Helm to manage your Kuberneters applications in the production environment. Check it out if you are interested, but for a demo purpose, using Kubernetes YAML file directly is more efficient.
]]>Kubernetes is different from Docker Swarm, it has Pods and running Containers inside Pods. Here is a simplified Kubernetes architecture diagram. In this tutorial, we are going to go through all the steps from setup Kubernetes on your local device to run Rails on a local Kubernetes cluster.
Activate Kubernetes Support on Docker for Mac
Using Docker App is a very common way for engineers to run and debug Kubernetes on local devices. You can enable Kubernetes by clicking on the checkbox.
Let's make sure we already connected to the Docker-Desktop, please set up the config first if it's not. Each context has its namespaces and users.
➜  ~ kubectl config get-contexts
CURRENT   NAME                 CLUSTER                      AUTHINFO             NAMESPACE
*         docker-for-desktop   docker-for-desktop-cluster   docker-for-desktop
          minikube             minikube                     minikube

➜  ~ kubectl config use-context docker-for-desktop
Switched to context "docker-for-desktop".
Create a Rails Project
Rails New
First of all, if you don't get any Rails project on your hand, create a new one. Since we don't need run Rails on the host machine, just skip installing Gem packages by adding --skip-bundle.
rails new rails-on-kube --skip-bundle
Create Docker Entypoint
Once you get a Rails project created, touch a docker entry point file docker-entrypoint.sh.
To build a docker image, we need to create a Dockerfile at the project root directory.
FROM ruby:2.6.0-alpine

RUN apk --update add build-base tzdata git \
    libxslt-dev libxml2-dev openssl \
    sqlite-dev yarn\
    && rm -rf /var/cache/apk/*
RUN gem install bundler

ENV RAILS_ROOT /var/www
WORKDIR $RAILS_ROOT

COPY Gemfile* ./

ENV RAILS_ENV=production

RUN bundle install --jobs 10 --retry 5 --without development test
RUN rails webpacker:install

COPY . .

RUN chmod u+x docker-entrypoint.sh
CMD ["sh", "docker-entrypoint.sh"]
Build Project Image
Now, we come to the last steps of creating a Rails project image. Paste and run the following command, a new Docker image will be available on your local.
docker build -f Dockerfile -t rails-on-kube .
Setup Kubernetes for Rails
Finally, we reach the last part of setting up Kubernetes. We should keep in mind, every object in a Kubernetes context can be considered as a resource, each resource can be defined by a YAML file.
To keep this tutorial clear and sample, we only need one resource YAML file, here we go.
Create Kubernetes Resource File
Filename rails-on-kube.yaml
In this file, we are going to deploy a Rails service based on the docker image we built before. imagePullPolicy: Never means using local images, or you may get an image Not-Found-Error.
replicas: 2 means there is going to have two replicas of the Rails service.
The two main functions of Deployment Yaml is to declare pods and setup replicas.
The last step is using kubectl apply to update the Kubernetes cluster to match the descriptions from a YAML file. Then, exposes an external IP address, so we can access the service.
I also got some extra command lines of Kubernetes for you to debug.
Debugging and Logging
# Get the detail of pods
kubectl describe pods

# Get the info of a service
kubectl get services rails-service
Exec Command in Container
# Show all service pods you created
kubectl get pods

# Exec sh in a pod
kubectl exec -it my-app-64d75bd9d9-8nlfk -- sh

# Show logs of a pod
kubectl logs rails-app-5897fdc7b8-dhvj6
In addition, it's better to use Helm to manage your Kuberneters applications in the production environment. Check it out if you are interested, but for a demo purpose, using Kubernetes YAML file directly is more efficient.
]]>2019-10-22T00:40:54-06:00Martin Tan<![CDATA[Using N2N VPN to Enable NAS Remote Accessing]]>https://mrtan.me/post/36.html
Background
I have multiple devices including a NAS, a Raspberry Pi, and two MacBooks in different networks, my home and office. All I need is that I want to let all these devices can be accessed in any of those networks. After searching on the internet, I found out n2n should be the one I looked for. The architecture and setup are very simple 👍.
Steps to Setup N2N Virtual Network
1. Setup a super node
The supernode should be run on a device that can be accessed from the public network. I'm using a VPS with public IP to run this, so all edge nodes can connect to it directly.
The VPS I have is based on Debian, and the following commands only testyed on Debian in this post. Let's say the public IP of the VPS is 200.200.200.200.
supernode -l 9053
# output

-> supernode -l 9053
07/Aug/2019 06:45:47 [supernode.c: 476] Supernode ready: listening on port 9053 [TCP/UDP]
2. Run edge nodes
We can have multiple edge nodes that connect to one super node. Don't forget to change the virtual IP of the following command.
now, we have a device with private network IP 192.168.100.1. If you have run this command on other devices, you can ping it from each other.
Run n2n in Docker Container
To run N2N VPN on macOS is not a good choice, I run into problems. It's better to use docker or vagrant, it depends on you.
# Dockerfile

FROM debian:stable-slim

RUN apt-get update && apt-get -y install iputils-ping n2n socat
# Build the Dockerfile
docker build -f Dockerfile -t n2n .

# Run a edge node
docker run -d -p 9091:9091/tcp --name=n2n --privileged --rm -it n2n edge -d n2n0 -a 192.168.100.1 -c YOU_NETWORK_NAME -k YOU_PASS -l 200.200.200.200:9053
Enable Port Forwarding
The port of 9091 is used by Transmission. At first, I tried to use iptables to forward port, so I can visit a remote Transmission by typing http://localhost:9091 in my browser on docker host device. But, it turns out not working, the socat is a good one for port forwarding. I also encountered a known bug of Linux, here the link if you are interested in it.
Run the command below in your edge node container.
# Forward a port

ifconfig n2n0 mtu 500
nohup socat TCP4-LISTEN:9091,fork TCP4:192.168.100.1:9091 &
Then, we can visit the Transimission web UI on my Chrome browser.
REPOSITORY
TAG
IMAGE ID
CREATED
SIZE
n2n
latest
f0628fbbb0e6
3 hours ago
93.4MB
CONTAINER ID
NAME
CPU %
MEM USAGE / LIMIT
MEM %
NET I/O
b6a1d36c60b2
n2n
0.00%
1.77MiB / 1.952GiB
0.09%
40.2kB / 39.7kB
From the two tables above, the memory and CPU usage is very small, don't have to worry about resource usage.
]]>
Background
I have multiple devices including a NAS, a Raspberry Pi, and two MacBooks in different networks, my home and office. All I need is that I want to let all these devices can be accessed in any of those networks. After searching on the internet, I found out n2n should be the one I looked for. The architecture and setup are very simple 👍.
Steps to Setup N2N Virtual Network
1. Setup a super node
The supernode should be run on a device that can be accessed from the public network. I'm using a VPS with public IP to run this, so all edge nodes can connect to it directly.
The VPS I have is based on Debian, and the following commands only testyed on Debian in this post. Let's say the public IP of the VPS is 200.200.200.200.
supernode -l 9053
# output

-> supernode -l 9053
07/Aug/2019 06:45:47 [supernode.c: 476] Supernode ready: listening on port 9053 [TCP/UDP]
2. Run edge nodes
We can have multiple edge nodes that connect to one super node. Don't forget to change the virtual IP of the following command.
now, we have a device with private network IP 192.168.100.1. If you have run this command on other devices, you can ping it from each other.
Run n2n in Docker Container
To run N2N VPN on macOS is not a good choice, I run into problems. It's better to use docker or vagrant, it depends on you.
# Dockerfile

FROM debian:stable-slim

RUN apt-get update && apt-get -y install iputils-ping n2n socat
# Build the Dockerfile
docker build -f Dockerfile -t n2n .

# Run a edge node
docker run -d -p 9091:9091/tcp --name=n2n --privileged --rm -it n2n edge -d n2n0 -a 192.168.100.1 -c YOU_NETWORK_NAME -k YOU_PASS -l 200.200.200.200:9053
Enable Port Forwarding
The port of 9091 is used by Transmission. At first, I tried to use iptables to forward port, so I can visit a remote Transmission by typing http://localhost:9091 in my browser on docker host device. But, it turns out not working, the socat is a good one for port forwarding. I also encountered a known bug of Linux, here the link if you are interested in it.
Run the command below in your edge node container.
# Forward a port

ifconfig n2n0 mtu 500
nohup socat TCP4-LISTEN:9091,fork TCP4:192.168.100.1:9091 &
Then, we can visit the Transimission web UI on my Chrome browser.
REPOSITORY
TAG
IMAGE ID
CREATED
SIZE
n2n
latest
f0628fbbb0e6
3 hours ago
93.4MB
CONTAINER ID
NAME
CPU %
MEM USAGE / LIMIT
MEM %
NET I/O
b6a1d36c60b2
n2n
0.00%
1.77MiB / 1.952GiB
0.09%
40.2kB / 39.7kB
From the two tables above, the memory and CPU usage is very small, don't have to worry about resource usage.
]]>2019-08-07T21:46:03-06:00Martin Tan<![CDATA[Error: Docker Error response from daemon: Container id is not running]]>https://mrtan.me/post/35.html
Issue
The following lines is an example of how to reproduce this error.
# Pull the latest version of alpine image from docker hub
➜ docker pull alpine

# Create a container from the alpine image and get on to the terminal of that container
➜ docker run -it --name alpine_bash alpine ash
➜ exit # inside the container

# Execute the command sh in that container
➜ docker exec -it alpine_bash sh
Here is the output.
Error response from daemon: Container 00f5f2aeae9f2d74b8f92d769da5086b4a72eaa01bdae8351fbd77b753e74b51 is not running
➜ docker run -it --name alpine_bash alpine sh

docker: Error response from daemon: Conflict. The container name "/alpine_bash" is already in use by container "00f5f2aeae9f2d74b8f92d769da5086b4a72eaa01bdae8351fbd77b753e74b51". You have to remove (or rename) that container to be able to reuse that name.
See 'docker run --help'.
We got this error because the container is stopped immediately after we exit the shell, no process is running anymore, and the docker exec is only working on running containers.
Solution
Remove the container automatically.
docker run -it --rm --name alpine_bash alpine sh
This is the description of --rm from official docker reference.
If instead you’d like Docker to automatically clean up the container and remove the file system when the container exits, you can add the --rm flag
Or we delete the container mannually.
➜ docker container ls -a

CONTAINER ID        IMAGE               COMMAND             CREATED             STATUS                     PORTS               NAMES
e877fcd9fe0e        alpine              "ash"               7 seconds ago       Exited (0) 5 seconds ago                       alpine_bash
# Delete container by name
docker container rm alpine_bash
]]>
Issue
The following lines is an example of how to reproduce this error.
# Pull the latest version of alpine image from docker hub
➜ docker pull alpine

# Create a container from the alpine image and get on to the terminal of that container
➜ docker run -it --name alpine_bash alpine ash
➜ exit # inside the container

# Execute the command sh in that container
➜ docker exec -it alpine_bash sh
Here is the output.
Error response from daemon: Container 00f5f2aeae9f2d74b8f92d769da5086b4a72eaa01bdae8351fbd77b753e74b51 is not running
➜ docker run -it --name alpine_bash alpine sh

docker: Error response from daemon: Conflict. The container name "/alpine_bash" is already in use by container "00f5f2aeae9f2d74b8f92d769da5086b4a72eaa01bdae8351fbd77b753e74b51". You have to remove (or rename) that container to be able to reuse that name.
See 'docker run --help'.
We got this error because the container is stopped immediately after we exit the shell, no process is running anymore, and the docker exec is only working on running containers.
Solution
Remove the container automatically.
docker run -it --rm --name alpine_bash alpine sh
This is the description of --rm from official docker reference.
If instead you’d like Docker to automatically clean up the container and remove the file system when the container exits, you can add the --rm flag
Or we delete the container mannually.
➜ docker container ls -a

CONTAINER ID        IMAGE               COMMAND             CREATED             STATUS                     PORTS               NAMES
e877fcd9fe0e        alpine              "ash"               7 seconds ago       Exited (0) 5 seconds ago                       alpine_bash
# Delete container by name
docker container rm alpine_bash
]]>2019-07-07T00:27:46-06:00Martin Tan<![CDATA[Error: An error occurred while installing nokogiri, and Bundler cannot continue on Ubuntu]]>https://mrtan.me/post/34.html
Issue
I got this error on when try to install nokogiri on a Ubuntu 18.10 server. It seems like I've not install the required packages correct on the system.
Gem::Ext::BuildError: ERROR: Failed to build gem native extension.

    current directory: /root/alert/vendor/bundle/ruby/2.5.0/gems/nokogiri-1.10.3/ext/nokogiri
/usr/bin/ruby2.5 -I /usr/local/lib/site_ruby/2.5.0 -r ./siteconf20190630-30475-1wuk0lw.rb extconf.rb
mkmf.rb can't find header files for ruby at /usr/lib/ruby/include/ruby.h

extconf failed, exit code 1

Gem files will remain installed in /root/alert/vendor/bundle/ruby/2.5.0/gems/nokogiri-1.10.3 for inspection.
Results logged to /root/alert/vendor/bundle/ruby/2.5.0/extensions/x86_64-linux/2.5.0/nokogiri-1.10.3/gem_make.out

An error occurred while installing nokogiri (1.10.3), and Bundler cannot continue.
Make sure that `gem install nokogiri -v '1.10.3' --source 'https://rubygems.org/'` succeeds before bundling.

In Gemfile:
  nokogiri
root@server:~/alert# gem install nokogiri -v '1.10.3' --source 'https://rubygems.org/'
Fetching nokogiri-1.10.3.gem
Fetching mini_portile2-2.4.0.gem
Successfully installed mini_portile2-2.4.0
Building native extensions. This could take a while...
ERROR:  Error installing nokogiri:
    ERROR: Failed to build gem native extension.

    current directory: /var/lib/gems/2.5.0/gems/nokogiri-1.10.3/ext/nokogiri
/usr/bin/ruby2.5 -I /usr/local/lib/site_ruby/2.5.0 -r ./siteconf20190630-30630-1ukvdw7.rb extconf.rb
mkmf.rb can't find header files for ruby at /usr/lib/ruby/include/ruby.h

extconf failed, exit code 1

Gem files will remain installed in /var/lib/gems/2.5.0/gems/nokogiri-1.10.3 for inspection.
Results logged to /var/lib/gems/2.5.0/extensions/x86_64-linux/2.5.0/nokogiri-1.10.3/gem_make.out
Solution
If you also got this issue on Ubuntu, use the following steps. The installation document is list on the official site of nokogiri, you can also check it out on that website.
]]>2019-06-30T13:11:41-06:00Martin Tan<![CDATA[ERROR: Error Installing Nokogiri: Invalid Gem: Package is Corrupt on Mac]]>https://mrtan.me/post/33.htmlIssue
This error came out when I'm trying to bundle install Rails with rbenv on my MacBook, after retry several times, finally got this solution to install Nokogiri successfully.
-> bundle

Bundler::GemspecError: Could not read gem at /Users/username/.rbenv/versions/2.6.0/lib/ruby/gems/2.6.0/cache/nokogiri-1.10.3.gem. It may be corrupted.
An error occurred while installing nokogiri (1.10.3), and Bundler cannot continue.
Make sure that `gem install nokogiri -v '1.10.3' --source 'https://rubygems.org/'` succeeds before bundling.
->  gem install nokogiri -v '1.10.3' --source 'https://rubygems.org/'

ERROR:  Error installing nokogiri:
    invalid gem: package is corrupt, exception while verifying: undefined method `size' for nil:NilClass (NoMethodError) in /Users/username/.rbenv/versions/2.6.0/lib/ruby/gems/2.6.0/cache/nokogiri-1.10.3.gem
]]>2019-06-24T21:43:49-06:00Martin Tan<![CDATA[The Behaviors of Dependent Destroy on Rails ActiveModel]]>https://mrtan.me/post/32.html
what is dependent :destroy
Dependent is an option of Rails collection association declaration to cascade the delete action. The :destroy is to cause the associated object to also be destroyed when its owner is destroyed.
Code Preparation
First, the DB shemas and Rails Model should be ready for the following experiment.
rails g model books
rails g model authors
rails g model comments
rails g model authors_books

rails g migration CreateJoinTableBooksAuthors books authors
Migrations
The migration files should be looked like as listed.
# db/migrate/2019_create_join_table_books_authors.rb

class CreateJoinTableBooksAuthors < ActiveRecord::Migration[6.0]
  def change
    create_table :authors_books do |t|
      t.integer "book_id", null: false
      t.integer "author_id", null: false

      t.index [:book_id, :author_id], unique: true
      t.index [:author_id, :book_id]

      t.timestamps
    end
  end
end
# db/migrate/2019_create_books.rb

class CreateBooks < ActiveRecord::Migration[6.0]
  def change
    create_table :books do |t|
      t.string :name, null: false
      t.timestamps
    end
  end
end
# db/migrate/2019_create_authors.rb

class CreateAuthors < ActiveRecord::Migration[6.0]
  def change
    create_table :authors do |t|
      t.string :name, index: { unique: true }, null: false
      t.timestamps
    end
  end
end
# db/migrate/2019_create_comments.rb

class CreateComments < ActiveRecord::Migration[6.0]
  def change
    create_table :comments do |t|
      t.integer :book_id, null: false
      t.string :content, null: false
      t.timestamps
    end
  end
end
# db/migrate/2019_create_details.rb

class CreateDetails < ActiveRecord::Migration[6.0]
  def change
    create_table :details do |t|
      t.integer :book_id, null: false
      t.integer :paperback, null: false
      t.string :publisher, null: false

      t.timestamps
    end
  end
end
Run the db migration commands
rails db:create
rails db:migrate
Models
Then update the model files for querying.
# app/models/author.rb

class Author < ApplicationRecord
  has_many :authors_books
  has_many :books, through: :authors_books, dependent: :destroy
end
# app/models/authors_book.rb

class AuthorsBook < ApplicationRecord
  belongs_to :author
  belongs_to :book

  validates :author, :book, presence: true
end
# app/models/book.rb

class Book < ApplicationRecord
  has_many :comments, dependent: :destroy
  has_many :authors_books
  has_many :authors, through: :authors_books, dependent: :destroy
  has_one :detail, dependent: :destroy
end
# app/models/comment.rb

class Comment < ApplicationRecord
  belongs_to :book
end
# app/models/detail.rb

class Detail < ApplicationRecord
  belongs_to :book, dependent: :destroy
end
If you want to keep the strict one to one relations betweens books and details, you can add dependent: :destroy on both sides to remove the combined records. On contract, the book record won't be deleted when the detail record is destroyed.
If the owner record is delete, all the assocated records will be deleted immediately. Such as, if the a book row is delete in the books table, all the related coments will be delete as well. But, if a comment is deleted, the related book row won't be delete.
Removing records from the pivot table , only applied on that pivot table, no assocated records will be delete. In the case, authors and books won't be deleted when deleting authors_books rows.
If a assocated record is delete, the relation rows in that pivot table will also be deleted and all these operations are wrapped in a transaction.
Conclusion
In one -to-one, and one-to-many scenarios, has_one or has_many, the associated records will be deleted if the owner record got deleted. But, With has_and_belongs_to_many and has_many :through, the many to many scenario, the join records will be deleted, but the associated records won't.
]]>
what is dependent :destroy
Dependent is an option of Rails collection association declaration to cascade the delete action. The :destroy is to cause the associated object to also be destroyed when its owner is destroyed.
Code Preparation
First, the DB shemas and Rails Model should be ready for the following experiment.
rails g model books
rails g model authors
rails g model comments
rails g model authors_books

rails g migration CreateJoinTableBooksAuthors books authors
Migrations
The migration files should be looked like as listed.
# db/migrate/2019_create_join_table_books_authors.rb

class CreateJoinTableBooksAuthors < ActiveRecord::Migration[6.0]
  def change
    create_table :authors_books do |t|
      t.integer "book_id", null: false
      t.integer "author_id", null: false

      t.index [:book_id, :author_id], unique: true
      t.index [:author_id, :book_id]

      t.timestamps
    end
  end
end
# db/migrate/2019_create_books.rb

class CreateBooks < ActiveRecord::Migration[6.0]
  def change
    create_table :books do |t|
      t.string :name, null: false
      t.timestamps
    end
  end
end
# db/migrate/2019_create_authors.rb

class CreateAuthors < ActiveRecord::Migration[6.0]
  def change
    create_table :authors do |t|
      t.string :name, index: { unique: true }, null: false
      t.timestamps
    end
  end
end
# db/migrate/2019_create_comments.rb

class CreateComments < ActiveRecord::Migration[6.0]
  def change
    create_table :comments do |t|
      t.integer :book_id, null: false
      t.string :content, null: false
      t.timestamps
    end
  end
end
# db/migrate/2019_create_details.rb

class CreateDetails < ActiveRecord::Migration[6.0]
  def change
    create_table :details do |t|
      t.integer :book_id, null: false
      t.integer :paperback, null: false
      t.string :publisher, null: false

      t.timestamps
    end
  end
end
Run the db migration commands
rails db:create
rails db:migrate
Models
Then update the model files for querying.
# app/models/author.rb

class Author < ApplicationRecord
  has_many :authors_books
  has_many :books, through: :authors_books, dependent: :destroy
end
# app/models/authors_book.rb

class AuthorsBook < ApplicationRecord
  belongs_to :author
  belongs_to :book

  validates :author, :book, presence: true
end
# app/models/book.rb

class Book < ApplicationRecord
  has_many :comments, dependent: :destroy
  has_many :authors_books
  has_many :authors, through: :authors_books, dependent: :destroy
  has_one :detail, dependent: :destroy
end
# app/models/comment.rb

class Comment < ApplicationRecord
  belongs_to :book
end
# app/models/detail.rb

class Detail < ApplicationRecord
  belongs_to :book, dependent: :destroy
end
If you want to keep the strict one to one relations betweens books and details, you can add dependent: :destroy on both sides to remove the combined records. On contract, the book record won't be deleted when the detail record is destroyed.
If the owner record is delete, all the assocated records will be deleted immediately. Such as, if the a book row is delete in the books table, all the related coments will be delete as well. But, if a comment is deleted, the related book row won't be delete.
Removing records from the pivot table , only applied on that pivot table, no assocated records will be delete. In the case, authors and books won't be deleted when deleting authors_books rows.
If a assocated record is delete, the relation rows in that pivot table will also be deleted and all these operations are wrapped in a transaction.
Conclusion
In one -to-one, and one-to-many scenarios, has_one or has_many, the associated records will be deleted if the owner record got deleted. But, With has_and_belongs_to_many and has_many :through, the many to many scenario, the join records will be deleted, but the associated records won't.
]]>2019-06-24T21:21:28-06:00Martin Tan<![CDATA[Rails GraphQL Beginner Tutorial - Part 1]]>https://mrtan.me/post/31.html
Goal
This article is the first post of rails GraphQL beginner serial, I'm going to create a demo to show how to use GraphQL in Rails by querying book records in DB.
First of all, let's list all the thing we need to know about the following steps.
Run the following commands to install graphql gem in Rails.
bundle install
rails generate graphql:install
Here is the output, you can see the directory of graphql is created by this command, also routes got updated.
A graphql interface is added to routes and another one is GraphiQL which only available in develop environment for debug purpose.
File content in routes.rb
Rails.application.routes.draw do
  if Rails.env.development?
    mount GraphiQL::Rails::Engine, at: "/graphiql", graphql_path: "/graphql"
  end
  post "/graphql", to: "graphql#execute"
  # For details on the DSL available within this file, see https://guides.rubyonrails.org/routing.html
end
Mock data
Generate a model
rails g model book
Paste the following code to db/migrate/20190610102537_create_books.rb.
class CreateBooks < ActiveRecord::Migration[6.0]
  def change
    create_table :books do |t|
      t.string :name, unique: true, null: false
      t.decimal :price, precision: 10, scale: 2, default: 0.0, null: false
      t.timestamps
    end
  end
end
Migrate table schema
rails db:migrate
Mock a book record in Rails Console
Book.create name: 'Where the Wild Things Are', price: '18.95'
Pull up the server
rails s
#http://localhost:3000/graphiql
It works well if you open the same page as what I have.
Link Book Model to GraphQL Interface
Add schema and queries for GraphQL
To link data in DB with GraphQL, we need to create a book_type.rb file and a book_query.rb file.
book_type.rb
module Types
  class BookType < Types::BaseObject
    description 'The book type of this schema'

    field :id, ID, null: false
    field :name, String, null: false
    field :price, String, null: false
  end
end
Before we create book query, we create a base query first.
base_query.rb
module Queries
  class BaseQuery < GraphQL::Schema::Resolver
  end
end
book_query.rb
module Queries
  class BookQuery < BaseQuery
    type Types::BookType, null: true
    description 'Find a book by id'

    argument :id, Integer, required: true

    def resolve(id:)
      Book.find_by(id: id)
    end
  end
end
Add the new book query to query_type.rb
query_type.rb
module Types
  class QueryType < Types::BaseObject
    field :book, resolver: Queries::BookQuery
  end
end
The files you changed and created should be the same as below.
Query Graphql Server
Query Graphql in Browser
Paste the query string to your GraphiQL web client and query.
Finally, we come to a successful end. This is the beginning article to show you how to integrate GraphQL in Rails, so I keep it as simple as I can and we have not seen the difference and advantage of GraphQL. I'll talk more in following posts.
]]>
Goal
This article is the first post of rails GraphQL beginner serial, I'm going to create a demo to show how to use GraphQL in Rails by querying book records in DB.
First of all, let's list all the thing we need to know about the following steps.
Run the following commands to install graphql gem in Rails.
bundle install
rails generate graphql:install
Here is the output, you can see the directory of graphql is created by this command, also routes got updated.
A graphql interface is added to routes and another one is GraphiQL which only available in develop environment for debug purpose.
File content in routes.rb
Rails.application.routes.draw do
  if Rails.env.development?
    mount GraphiQL::Rails::Engine, at: "/graphiql", graphql_path: "/graphql"
  end
  post "/graphql", to: "graphql#execute"
  # For details on the DSL available within this file, see https://guides.rubyonrails.org/routing.html
end
Mock data
Generate a model
rails g model book
Paste the following code to db/migrate/20190610102537_create_books.rb.
class CreateBooks < ActiveRecord::Migration[6.0]
  def change
    create_table :books do |t|
      t.string :name, unique: true, null: false
      t.decimal :price, precision: 10, scale: 2, default: 0.0, null: false
      t.timestamps
    end
  end
end
Migrate table schema
rails db:migrate
Mock a book record in Rails Console
Book.create name: 'Where the Wild Things Are', price: '18.95'
Pull up the server
rails s
#http://localhost:3000/graphiql
It works well if you open the same page as what I have.
Link Book Model to GraphQL Interface
Add schema and queries for GraphQL
To link data in DB with GraphQL, we need to create a book_type.rb file and a book_query.rb file.
book_type.rb
module Types
  class BookType < Types::BaseObject
    description 'The book type of this schema'

    field :id, ID, null: false
    field :name, String, null: false
    field :price, String, null: false
  end
end
Before we create book query, we create a base query first.
base_query.rb
module Queries
  class BaseQuery < GraphQL::Schema::Resolver
  end
end
book_query.rb
module Queries
  class BookQuery < BaseQuery
    type Types::BookType, null: true
    description 'Find a book by id'

    argument :id, Integer, required: true

    def resolve(id:)
      Book.find_by(id: id)
    end
  end
end
Add the new book query to query_type.rb
query_type.rb
module Types
  class QueryType < Types::BaseObject
    field :book, resolver: Queries::BookQuery
  end
end
The files you changed and created should be the same as below.
Query Graphql Server
Query Graphql in Browser
Paste the query string to your GraphiQL web client and query.
Finally, we come to a successful end. This is the beginning article to show you how to integrate GraphQL in Rails, so I keep it as simple as I can and we have not seen the difference and advantage of GraphQL. I'll talk more in following posts.
]]>2019-06-18T23:56:33-06:00Martin Tan<![CDATA[My Mid-Year Coding Review 2019: Magic Tips for Coding]]>https://mrtan.me/post/30.html
This article is a brief review of the last half year in my professional life, and all these topics are flowing in my mind for months. It's better to release the reins, let the paw-prints appear on the paper.
I took a long work gap, which went through the whole hot summer last year, to have a vacation, meanwhile, it's a certain time when introspection happens. After this, I joined a new company, same position as a web developer, but got to learn a new language Ruby in a different industry both of these I never had experienced before.
Time goes faster than you think, and you also have sailed far far away along your new direction. I looked back and asked my self what's the balance of diving into a new language, and what are the skillful tricks of being a more professional software engineer, while inertia was still forcing the ship forward to the blue water. It's not about the definition of enough or success in a career field. However it's like to introduce the way of how to take less effort, but make a better outcome. Fortunately, I got the following three practices which are short and should be asked to yourself before writing down your first line of code in every project.
Less is More
This should be the most famous slogan I've ever read in recent years, especially in product design books. This sentence is firstly created in the minimalism movement, architect Ludwig Mies van der Rohe (1886–1969) adopted the motto "Less is more" to describe his aesthetic.[^1] We don't have to work as artists, but there is a popular book describes coding as an art, same as painting, [^2]at least that is a theoretical status to describe what's the well performed coding work should be like.
Language Advantage
When I first got a chance to write the If-Condition in ruby, I was fascinated with the well-designed syntax sugar. See the code first.
def greet(name)
  return if name.empty?
  puts "Hi #{name}!"
end
From the code above, you can see the If-Condition is written like typing a sentence in your normal article, do nothing and return if the name is empty while trying to greet someone. Anyway, it's the first piece of code coming to my brain as usual. But how about this?
def greet(name)
  puts "Hi #{name}!" if !name.empty?
end
This If-Condition is written explicitly, just as What You See Is What You Get, and you don't even have to think about the meaning of this line before you understand it. You do the same thing with less code if you try a slight effort while writing down your thought, so cool.
Less Code
Another example is shared in a session from my colleague, the topic is about how to get better performance of testing. One of the rules, which I think is very helpful, is that writing down fewer test cases by using PRIVATE keyword more widely.
class Greeting
  def say(name)
    puts "Hi #{name}!" if validate(name)
  end

  def validate(name)
    return true if !name.empty?
  end
end

# Hi Martin!
Greeting.new.say 'Martin'
To get 100% of test coverage, we have to create at least two test cases for #say and #validate. As a contrast, we can use the PRIVATE keyword instead.
class Greeting
  def say(name)
    puts "Hi #{name}!" if validate(name)
  end

  private

  def validate(name)
    return true if !name.empty?
  end
end

# Hi Martin!
Greeting.new.say 'Martin'
Under this situation, we could achieve the 100% of test coverage by only adding one test case. Less code, but more productive.
Premature Optimization is the Root of All Evil
First of all, let me explain what is Premature Optimization when we are talking about coding. Premature Optimization can be defined as optimizing before we know that we need to. Optimizing up front is often regarded as breaking YouArentGonnaNeedIt (YAGNI).[^3]
While I have to clarify that this is not an excuse of being complacent with your code to avoid optimization. Most of our time is focusing on writing code, reviewing code, refactoring code, and all this kind of normal working flows are going to be excluded in this topic. The original quota of this is focusing on software efficiency optimization, which we talk less about during modern web developing, but It can still be considered as a golden sentence on code organization. Here I have two rules for you to determine whether it's prematurely optimized.
Don't Optimize Without a Clear Benefit
Snippet A
class TestParam
  def initialize
    @arguments = {
      author: 'Mark Twain',
      book: 'The Adventures of Tom Sawyer',
    }
  end

  def author
    @arguments[:author]
  end

  def book
    @arguments[:book]
  end
end

# output: Mark Twain
puts TestParam.new.author
# output: The Adventures of Tom Sawyer
puts TestParam.new.book
Snippet B
class TestParam
  def initialize
    @arguments = {
      author: 'Mark Twain',
      book: 'The Adventures of Tom Sawyer',
    }
  end

  def param(key)
    @arguments[key]
  end
end

# output: Mark Twain
puts TestParam.new.param :author
# output: The Adventures of Tom Sawyer
puts TestParam.new.param :book
Comparing A with B, B has fewer code lines, less method, but the code structure of A is more semantic. When you read the code, you'll know that you can only get two types of data from the instance, author name and book title. However, you can't get what are the exactly available items from B immediately after reading the code. It's an important rule that not optimize without a clear benefit by sacrificing code readability and maintainability.
Don't optimize without profiling
Today we've got a lot of profiling tools, static code analysis tools, tracing profiling tools, APM (Application Performance Monitoring ) tools, hence it's much easier for us to do profiling.
During the past months of running online services, I do have chances to refactor code and improve the performance. For example, after inspecting a high latency API, I just found out it's because of fetching lots of cache items one by one on our Redis server. The optimization solution is quite easy by combining multiple Redis requests to only one to reduce the network time-consuming.
On the other hand, I created a background job to synchronize user data from another service last week. In this job, it retrieves all the data for about 5k items by sending an API, and at the same, the unavailable records should also be deleted from DB. My solution is very straightforward by computing the two collections in memory, for the data from API and the data from DB. We really don't need to worry about the memory usage for now, since each item in the collection is about 200 bytes, it's only 2MB for 5K items.
In a Scrum training, our coach told us that new requirements and details are emerging during a Sprint. This theory is also suitable for coding. In a nutshell, this rule can be more sample that not try to optimize until the predictable bottleneck shows up.
To Be or Not to Be
Premature Optimization is one of the famous anti-patterns that we should be aware of. On the contrary, should we always follow design patterns? Lots of patterns are widely implemented in my past projects, like Singleton, Factory Method, IoC. I've read many articles about why we should follow the design patterns to avoid system design failed. Even during the earlier years in my career, colleagues are always talking about design pattern.
I was shocked that the first thing came in my mind is to choose which design pattern I'm going to use when I wrote down the code, but not to write down a simple working code. The intent of pattern is to provide a general solution for a commonly occurring problem in software design.[^4] In other words, design pattern cannot satisfy the unique of projects.
Straightforward above design patterns
Here is a code piece from https://github.com/storeon/router/ shows how to create routes based on the module, the code is straightforward.
Let's speak, what would you do if you are going to write a blog system and forget the design patterns. The pseudocode code of my solution is like this:
function response(uri)
  render 'post' and return if uri.matchs '/post'
  render 'category' and return if uri.matchs '/category'
  render 'home' and return if uri.matchs '/'
end
Since the routes of blog system are very simple, the straightforward way works better and the code is more readable. To handle a new route is also very simple by adding a new line of route code.
If you get a chance to see the API between different languages of Youtube, you can see they are the following the same structure and workflow, even it's not a good practice in those languages. I've seen a project that defines vast of fundamental interfaces as an influence of Google API style. In the code, the thought often lost in business logic and implementing different interfaces, although it's just to interact with a third party service which should be an easy thing to do.
You may wonder what is the best practice of coding, the answer there is not a general best practice for every project. Hence, no pattern fits every project, just ask yourself the sentences above and make the best choice depending on your own experience.
[^1]: https://en.wikipedia.org/wiki/Minimalism#cite_note-25 Less but better.
[^2]: https://www.goodreads.com/book/show/41793 Hackers_Painters
[^3]: http://wiki.c2.com/?PrematureOptimization Premature Optimization
[^4]: https://sourcemaking.com/design_patterns Design Patterns
]]>
This article is a brief review of the last half year in my professional life, and all these topics are flowing in my mind for months. It's better to release the reins, let the paw-prints appear on the paper.
I took a long work gap, which went through the whole hot summer last year, to have a vacation, meanwhile, it's a certain time when introspection happens. After this, I joined a new company, same position as a web developer, but got to learn a new language Ruby in a different industry both of these I never had experienced before.
Time goes faster than you think, and you also have sailed far far away along your new direction. I looked back and asked my self what's the balance of diving into a new language, and what are the skillful tricks of being a more professional software engineer, while inertia was still forcing the ship forward to the blue water. It's not about the definition of enough or success in a career field. However it's like to introduce the way of how to take less effort, but make a better outcome. Fortunately, I got the following three practices which are short and should be asked to yourself before writing down your first line of code in every project.
Less is More
This should be the most famous slogan I've ever read in recent years, especially in product design books. This sentence is firstly created in the minimalism movement, architect Ludwig Mies van der Rohe (1886–1969) adopted the motto "Less is more" to describe his aesthetic.[^1] We don't have to work as artists, but there is a popular book describes coding as an art, same as painting, [^2]at least that is a theoretical status to describe what's the well performed coding work should be like.
Language Advantage
When I first got a chance to write the If-Condition in ruby, I was fascinated with the well-designed syntax sugar. See the code first.
def greet(name)
  return if name.empty?
  puts "Hi #{name}!"
end
From the code above, you can see the If-Condition is written like typing a sentence in your normal article, do nothing and return if the name is empty while trying to greet someone. Anyway, it's the first piece of code coming to my brain as usual. But how about this?
def greet(name)
  puts "Hi #{name}!" if !name.empty?
end
This If-Condition is written explicitly, just as What You See Is What You Get, and you don't even have to think about the meaning of this line before you understand it. You do the same thing with less code if you try a slight effort while writing down your thought, so cool.
Less Code
Another example is shared in a session from my colleague, the topic is about how to get better performance of testing. One of the rules, which I think is very helpful, is that writing down fewer test cases by using PRIVATE keyword more widely.
class Greeting
  def say(name)
    puts "Hi #{name}!" if validate(name)
  end

  def validate(name)
    return true if !name.empty?
  end
end

# Hi Martin!
Greeting.new.say 'Martin'
To get 100% of test coverage, we have to create at least two test cases for #say and #validate. As a contrast, we can use the PRIVATE keyword instead.
class Greeting
  def say(name)
    puts "Hi #{name}!" if validate(name)
  end

  private

  def validate(name)
    return true if !name.empty?
  end
end

# Hi Martin!
Greeting.new.say 'Martin'
Under this situation, we could achieve the 100% of test coverage by only adding one test case. Less code, but more productive.
Premature Optimization is the Root of All Evil
First of all, let me explain what is Premature Optimization when we are talking about coding. Premature Optimization can be defined as optimizing before we know that we need to. Optimizing up front is often regarded as breaking YouArentGonnaNeedIt (YAGNI).[^3]
While I have to clarify that this is not an excuse of being complacent with your code to avoid optimization. Most of our time is focusing on writing code, reviewing code, refactoring code, and all this kind of normal working flows are going to be excluded in this topic. The original quota of this is focusing on software efficiency optimization, which we talk less about during modern web developing, but It can still be considered as a golden sentence on code organization. Here I have two rules for you to determine whether it's prematurely optimized.
Don't Optimize Without a Clear Benefit
Snippet A
class TestParam
def initialize
@arguments = {
author: 'Mark Twain',
book: 'The Adventures of Tom Sawyer',
}
end
def author
@arguments[:author]
end
def book
@arguments[:book]
end
end
# output: Mark Twain
puts TestParam.new.author
# output: The Adventures of Tom Sawyer
puts TestParam.new.book
Snippet B
class TestParam
def initialize
@arguments = {
author: 'Mark Twain',
book: 'The Adventures of Tom Sawyer',
}
end
def param(key)
@arguments[key]
end
end
# output: Mark Twain
puts TestParam.new.param :author
# output: The Adventures of Tom Sawyer
puts TestParam.new.param :book
Comparing A with B, B has fewer code lines, less method, but the code structure of A is more semantic. When you read the code, you'll know that you can only get two types of data from the instance, author name and book title. However, you can't get what are the exactly available items from B immediately after reading the code. It's an important rule that not optimize without a clear benefit by sacrificing code readability and maintainability.
Don't optimize without profiling
Today we've got a lot of profiling tools, static code analysis tools, tracing profiling tools, APM (Application Performance Monitoring ) tools, hence it's much easier for us to do profiling.
During the past months of running online services, I do have chances to refactor code and improve the performance. For example, after inspecting a high latency API, I just found out it's because of fetching lots of cache items one by one on our Redis server. The optimization solution is quite easy by combining multiple Redis requests to only one to reduce the network time-consuming.
On the other hand, I created a background job to synchronize user data from another service last week. In this job, it retrieves all the data for about 5k items by sending an API, and at the same, the unavailable records should also be deleted from DB. My solution is very straightforward by computing the two collections in memory, for the data from API and the data from DB. We really don't need to worry about the memory usage for now, since each item in the collection is about 200 bytes, it's only 2MB for 5K items.
In a Scrum training, our coach told us that new requirements and details are emerging during a Sprint. This theory is also suitable for coding. In a nutshell, this rule can be more sample that not try to optimize until the predictable bottleneck shows up.
To Be or Not to Be
Premature Optimization is one of the famous anti-patterns that we should be aware of. On the contrary, should we always follow design patterns? Lots of patterns are widely implemented in my past projects, like Singleton, Factory Method, IoC. I've read many articles about why we should follow the design patterns to avoid system design failed. Even during the earlier years in my career, colleagues are always talking about design pattern.
I was shocked that the first thing came in my mind is to choose which design pattern I'm going to use when I wrote down the code, but not to write down a simple working code. The intent of pattern is to provide a general solution for a commonly occurring problem in software design.[^4] In other words, design pattern cannot satisfy the unique of projects.
Straightforward above design patterns
Here is a code piece from https://github.com/storeon/router/ shows how to create routes based on the module, the code is straightforward.
Let's speak, what would you do if you are going to write a blog system and forget the design patterns. The pseudocode code of my solution is like this:
function response(uri)
render 'post' and return if uri.matchs '/post'
render 'category' and return if uri.matchs '/category'
render 'home' and return if uri.matchs '/'
end
Since the routes of blog system are very simple, the straightforward way works better and the code is more readable. To handle a new route is also very simple by adding a new line of route code.
If you get a chance to see the API between different languages of Youtube, you can see they are the following the same structure and workflow, even it's not a good practice in those languages. I've seen a project that defines vast of fundamental interfaces as an influence of Google API style. In the code, the thought often lost in business logic and implementing different interfaces, although it's just to interact with a third party service which should be an easy thing to do.
You may wonder what is the best practice of coding, the answer there is not a general best practice for every project. Hence, no pattern fits every project, just ask yourself the sentences above and make the best choice depending on your own experience.
[^1]: https://en.wikipedia.org/wiki/Minimalism#cite_note-25 Less but better.
[^2]: https://www.goodreads.com/book/show/41793 Hackers_Painters
[^3]: http://wiki.c2.com/?PrematureOptimization Premature Optimization
[^4]: https://sourcemaking.com/design_patterns Design Patterns
]]>2019-06-03T23:57:21-06:00Martin Tan<![CDATA[Java Load Balancer Simulator Based on Random Array Queue]]>https://mrtan.me/post/29.html
Thinking of there are hundreds of thousands of users request a website at the same time, we must have multiple servers to make sure our service is stable and won't out of usage. You may ask how could we distribute requests to these different servers, the answer is Load Balancer. Load Balancer is a service to distribute network traffic across multiple servers.
Question
The load balancer simulation maintains a random queue of queues and builds the computation around an inner loop where each new request for service goes on the smallest of a sample of queues, using the sample() method from RandomQueue to randomly sample queues.
Implementing Steps
Different load balancing algorithms have different application scenarios, such as Round Robin, IP Hash, Least Connections. This time we are going to use a random queue, an easy implementation of Least Connections, to simulate load balancer. Let's create a Load Balancer Simulator based on a random queue.
Create a random queue with a specified size to maintain the servers
Dequeue a server randomly
Dequeue other servers with a specified sample-times until pick out the server with the minimum requests passed to.
passing a request to this server
Solution
/******************************************************************************
* Compilation: javac LoadBalance.java
* Execution: java LoadBalance 5 5000 0
* Dependencies: RandomArrayQueue.java @link https://mrtan.me/post/22.html
*
* Passing m requests to n servers with a limited random picking times.
*
* % java LoadBalance 5 5000 0
* total Servers: 5
* total Reqeusts: 5000
* Sample Time: 0
* [956.0, 995.0, 959.0, 1080.0, 1010.0]
*
******************************************************************************/
import java.util.Arrays;
public class LoadBalance {
public static void main(String[] args) {
int totalServers= Integer.parseInt(args[0]);
int totalRequests = Integer.parseInt(args[1]);
int sampleTime = Integer.parseInt(args[2]);
System.out.println("total Servers: " + totalServers);
System.out.println("total Reqeusts: " + totalRequests);
System.out.println("Sample Time: " + sampleTime);
// Create server queues.
RandomArrayQueue<Queue<Integer>> servers;
servers = new RandomArrayQueue<Queue<Integer>>();
for (int i = 0; i < totalServers; i++) {
servers.enqueue(new Queue<Integer>());
}
// Passing reqeusts to servers
for (int j = 0; j < totalRequests; j++) {
Queue<Integer> min = servers.sample();
for (int k = 1; k < sampleTime; k++) {
// Pick a sample
Queue<Integer> queue = servers.sample();
if (queue.size() < min.size()) min = queue;
}
// min surpposed to be the shortest server queue.
min.enqueue(j);
}
int i = 0;
double[] lengths = new double[totalServers];
for (Queue<Integer> queue : servers)
lengths[i++] = queue.size();
System.out.println(Arrays.toString(lengths));
}
}
Output
-> java LoadBalance 5 5000 0
total Servers: 5
total Reqeusts: 5000
Sample Time: 0
[956.0, 995.0, 959.0, 1080.0, 1010.0]
-> java LoadBalance 5 5000 2
total Servers: 5
total Reqeusts: 5000
Sample Time: 2
[999.0, 1000.0, 1000.0, 1001.0, 1000.0]
image - result 1
image - result 2
The second output gets a well-balanced result, seems like the 2 is a good sample value for 5000 / 5.
The time complexity of this implementation is Θ(n) because it's an array-based queue which the BIG O of access item isΘ(1), so the total complexity depends on sample-times in the implementation steps.
]]>
Thinking of there are hundreds of thousands of users request a website at the same time, we must have multiple servers to make sure our service is stable and won't out of usage. You may ask how could we distribute requests to these different servers, the answer is Load Balancer. Load Balancer is a service to distribute network traffic across multiple servers.
Question
The load balancer simulation maintains a random queue of queues and builds the computation around an inner loop where each new request for service goes on the smallest of a sample of queues, using the sample() method from RandomQueue to randomly sample queues.
Implementing Steps
Different load balancing algorithms have different application scenarios, such as Round Robin, IP Hash, Least Connections. This time we are going to use a random queue, an easy implementation of Least Connections, to simulate load balancer. Let's create a Load Balancer Simulator based on a random queue.
Create a random queue with a specified size to maintain the servers
Dequeue a server randomly
Dequeue other servers with a specified sample-times until pick out the server with the minimum requests passed to.
passing a request to this server
Solution
/******************************************************************************
* Compilation: javac LoadBalance.java
* Execution: java LoadBalance 5 5000 0
* Dependencies: RandomArrayQueue.java @link https://mrtan.me/post/22.html
*
* Passing m requests to n servers with a limited random picking times.
*
* % java LoadBalance 5 5000 0
* total Servers: 5
* total Reqeusts: 5000
* Sample Time: 0
* [956.0, 995.0, 959.0, 1080.0, 1010.0]
*
******************************************************************************/
import java.util.Arrays;
public class LoadBalance {
public static void main(String[] args) {
int totalServers= Integer.parseInt(args[0]);
int totalRequests = Integer.parseInt(args[1]);
int sampleTime = Integer.parseInt(args[2]);
System.out.println("total Servers: " + totalServers);
System.out.println("total Reqeusts: " + totalRequests);
System.out.println("Sample Time: " + sampleTime);
// Create server queues.
RandomArrayQueue<Queue<Integer>> servers;
servers = new RandomArrayQueue<Queue<Integer>>();
for (int i = 0; i < totalServers; i++) {
servers.enqueue(new Queue<Integer>());
}
// Passing reqeusts to servers
for (int j = 0; j < totalRequests; j++) {
Queue<Integer> min = servers.sample();
for (int k = 1; k < sampleTime; k++) {
// Pick a sample
Queue<Integer> queue = servers.sample();
if (queue.size() < min.size()) min = queue;
}
// min surpposed to be the shortest server queue.
min.enqueue(j);
}
int i = 0;
double[] lengths = new double[totalServers];
for (Queue<Integer> queue : servers)
lengths[i++] = queue.size();
System.out.println(Arrays.toString(lengths));
}
}
Output
-> java LoadBalance 5 5000 0
total Servers: 5
total Reqeusts: 5000
Sample Time: 0
[956.0, 995.0, 959.0, 1080.0, 1010.0]
-> java LoadBalance 5 5000 2
total Servers: 5
total Reqeusts: 5000
Sample Time: 2
[999.0, 1000.0, 1000.0, 1001.0, 1000.0]
image - result 1
image - result 2
The second output gets a well-balanced result, seems like the 2 is a good sample value for 5000 / 5.
The time complexity of this implementation is Θ(n) because it's an array-based queue which the BIG O of access item isΘ(1), so the total complexity depends on sample-times in the implementation steps.
]]>2019-04-15T23:17:20-06:00Martin Tan<![CDATA[Java Merging Two Sorted Queues in Ascending Order]]>https://mrtan.me/post/28.html
A sorted queue means the items in this queue are in descending order or ascending order. If we insert the items into a new queue one by one and keep the previous order, the new queue should also be sorted.
Question
4.3.42 Merging two sorted queues. Given two queues with strings in ascending order, move all of the strings to a third queue so that the third queue ends up with the strings in ascending order.
Computer Science An Interdisciplinary Approach (2016, page 260).
Implementing Steps
This time, we are going to implement queues based on java.util.Queue instead of the Queue created by ourself. The queue interface from java util uses add method to enqueue a new item, uses poll to dequeue an existing item and uses peek to retrieve the value at the head of the queue, but without removing that item.
Here goes the key steps:
There are two sorted queues A, B, and an empty queue C.
Peek two items from A, B if not empty.
Poll and Insert the greater value to the empty queue.
Return to step 2.
Insert the remaining items into C if A or B is not empty.
Solution
/******************************************************************************
* Compilation: javac MergingTwoSortedQueues.java
* Execution: java MergingTwoSortedQueues
*
* Merging two ascending sorted queues to one queue with ascending order.
*
* % java MergingTwoSortedQueues
* First queue:
* [a, b, g, h]
*
* Second queue:
* [A, c, d, e, f]
*
* Merged queue:
* [A, a, b, c, d, e, f, g, h]
*
******************************************************************************/
import java.util.Queue;
import java.util.PriorityQueue;
class MergingTwoSortedQueues {
public static void main(String[] args) {
Queue first = new PriorityQueue<String>();
Queue second = new PriorityQueue<String>();
first.add("a");
first.add("b");
first.add("g");
first.add("h");
second.add("A");
second.add("c");
second.add("d");
second.add("e");
second.add("f");
System.out.println("First queue: ");
System.out.println(first.toString());
System.out.println("\nSecond queue: ");
System.out.println(second.toString());
Queue result = MergingTwoSortedQueues.merge(first, second);
System.out.println("\nMerged queue: ");
System.out.println(result.toString());
}
public static Queue<String> merge(Queue<String> first, Queue<String> second) {
Queue<String> mergedQueue = new PriorityQueue<String>();
// If both queues are not empty.
while (!first.isEmpty() && !second.isEmpty()) {
String left = first.peek();
String right = second.peek();
if (left.compareTo(right) < 0) {
mergedQueue.add(first.poll());
} else {
mergedQueue.add(second.poll());
}
}
// If there are remaining items in one of the queue.
while (!first.isEmpty()) {
mergedQueue.add(first.poll());
}
while (!second.isEmpty()) {
mergedQueue.add(second.poll());
}
return mergedQueue;
}
}
Output
-> javac MergingTwoSortedQueues.java
Note: MergingTwoSortedQueues.java uses unchecked or unsafe operations.
Note: Recompile with -Xlint:unchecked for details.
-> java MergingTwoSortedQueues
First queue:
[a, b, g, h]
Second queue:
[A, c, d, e, f]
Merged queue:
[A, a, b, c, d, e, f, g, h]
The time complexity of merging two sorted queues in this implementation is Θ(n).
]]>
A sorted queue means the items in this queue are in descending order or ascending order. If we insert the items into a new queue one by one and keep the previous order, the new queue should also be sorted.
Question
4.3.42 Merging two sorted queues. Given two queues with strings in ascending order, move all of the strings to a third queue so that the third queue ends up with the strings in ascending order.
Computer Science An Interdisciplinary Approach (2016, page 260).
Implementing Steps
This time, we are going to implement queues based on java.util.Queue instead of the Queue created by ourself. The queue interface from java util uses add method to enqueue a new item, uses poll to dequeue an existing item and uses peek to retrieve the value at the head of the queue, but without removing that item.
Here goes the key steps:
There are two sorted queues A, B, and an empty queue C.
Peek two items from A, B if not empty.
Poll and Insert the greater value to the empty queue.
Return to step 2.
Insert the remaining items into C if A or B is not empty.
Solution
/******************************************************************************
* Compilation: javac MergingTwoSortedQueues.java
* Execution: java MergingTwoSortedQueues
*
* Merging two ascending sorted queues to one queue with ascending order.
*
* % java MergingTwoSortedQueues
* First queue:
* [a, b, g, h]
*
* Second queue:
* [A, c, d, e, f]
*
* Merged queue:
* [A, a, b, c, d, e, f, g, h]
*
******************************************************************************/
import java.util.Queue;
import java.util.PriorityQueue;
class MergingTwoSortedQueues {
public static void main(String[] args) {
Queue first = new PriorityQueue<String>();
Queue second = new PriorityQueue<String>();
first.add("a");
first.add("b");
first.add("g");
first.add("h");
second.add("A");
second.add("c");
second.add("d");
second.add("e");
second.add("f");
System.out.println("First queue: ");
System.out.println(first.toString());
System.out.println("\nSecond queue: ");
System.out.println(second.toString());
Queue result = MergingTwoSortedQueues.merge(first, second);
System.out.println("\nMerged queue: ");
System.out.println(result.toString());
}
public static Queue<String> merge(Queue<String> first, Queue<String> second) {
Queue<String> mergedQueue = new PriorityQueue<String>();
// If both queues are not empty.
while (!first.isEmpty() && !second.isEmpty()) {
String left = first.peek();
String right = second.peek();
if (left.compareTo(right) < 0) {
mergedQueue.add(first.poll());
} else {
mergedQueue.add(second.poll());
}
}
// If there are remaining items in one of the queue.
while (!first.isEmpty()) {
mergedQueue.add(first.poll());
}
while (!second.isEmpty()) {
mergedQueue.add(second.poll());
}
return mergedQueue;
}
}
Output
-> javac MergingTwoSortedQueues.java
Note: MergingTwoSortedQueues.java uses unchecked or unsafe operations.
Note: Recompile with -Xlint:unchecked for details.
-> java MergingTwoSortedQueues
First queue:
[a, b, g, h]
Second queue:
[A, c, d, e, f]
Merged queue:
[A, a, b, c, d, e, f, g, h]
The time complexity of merging two sorted queues in this implementation is Θ(n).
]]>2019-04-03T21:30:00+08:00Martin Tan<![CDATA[Ring Buffer - Java Implementation of Circular Queue Using Fixed-length Array]]>https://mrtan.me/post/27.html
Ring Buffer also is known as Circular Queue is a type of linear data structure. It following the FIFO rule of Queue, but it doesn't have an ending position. The last inserted item can overwrite the existing items, the front and rear are connected together like a ring and often used as Buffer in the software industry. That's why we call it Ring Buffer.
Question
4.3.41 Ring buffer. A ring buffer (or circular queue) is a FIFO collection that stores a sequence of items, up to a prespecified limit. If you insert an item into a ring buffer that is full, the new item replaces the least recently inserted item. Ring buffers are useful for transferring data between asynchronous processes and for storing log files. When the buffer is empty, the consumer waits until data is deposited; when the buffer is full, the producer waits to deposit data. Develop an API for a ring buffer and an implementation that uses a fixed-length array.
Computer Science An Interdisciplinary Approach (2016, page 260).
Implementing Steps
In this solution, we are going to use a fixed-length array as the element's container. Using the Enqueue and Dequeue methods to manage the elements. The differences between this implementation and a normal queue are the size of the elements are not incrementable and elements can be overwritten.
Here goes the key points:
Fixed-length array.
Using two variable to track the read-position and write-position of the queue. Initializing the value of two positions to -1.
if a position beyond the end of the array's length, reset the position to zero.
if the write-positon cached up with the front position, increase the read-position by 1.
if the read-position cached up with the write-position, reset positions to -1.
Be aware of the starting value of the two positions.
Solution
/******************************************************************************
* Compilation: javac CircularQueue.java
* Execution: java CircularQueue
*
* Using a fixed-length array to implement a FIFO queue.
*
* % java CircularQueue
* Print out the queue.
* [a, b, c, d, e, f]
*
* Add a new element to the full circle queue.
* [g, b, c, d, e, f]
*
* Read elements from the cilcle queue.
* b
* c
* d
* e
* f
*
* Add a new element X to the circle queue.
* [g, X, null, null, null, null]
* Continue reading elements from the circle queue.
* g
* [null, X, null, null, null, null]
* X
* [null, null, null, null, null, null]
*
* Add new elements to the circle queue.
* [Y, Z, null, null, null, null]
* Read one more element from the circle queue.
* Y
* [null, Z, null, null, null, null]
*
******************************************************************************/
import java.util.Arrays;
class CircularQueue<Item> {
private int capacity;
public int readPos = -1;
public int writePos = -1;
private Item[] elements;
public static void main(String[] args) {
CircularQueue<String> circle = new CircularQueue<String>(6);
circle.enqueue("a");
circle.enqueue("b");
circle.enqueue("c");
circle.enqueue("d");
circle.enqueue("e");
circle.enqueue("f");
System.out.println("Print out the queue.");
System.out.println(circle.toString());
System.out.println("\nAdd a new element to the full circle queue.");
circle.enqueue("g");
System.out.println(circle.toString());
System.out.println("\nRead elements from the cilcle queue.");
System.out.println(circle.dequeue());
System.out.println(circle.dequeue());
System.out.println(circle.dequeue());
System.out.println(circle.dequeue());
System.out.println(circle.dequeue());
System.out.println("\nAdd a new element X to the circle queue.");
circle.enqueue("X");
System.out.println(circle.toString());
System.out.println("Continue reading elements from the circle queue.");
System.out.println(circle.dequeue());
System.out.println(circle.toString());
System.out.println(circle.dequeue());
System.out.println(circle.toString());
System.out.println("\nAdd new elements to the circle queue.");
circle.enqueue("Y");
circle.enqueue("Z");
System.out.println(circle.toString());
System.out.println("Read one more element from the circle queue.");
System.out.println(circle.dequeue());
System.out.println(circle.toString());
}
public CircularQueue(int capacity) {
this.capacity = capacity;
elements = (Item[])new Object[capacity];
}
public void enqueue(Item item) {
incrementWritePos();
elements[writePos] = item;
}
public Item dequeue() {
incrementReadPos();
Item element = elements[readPos];
elements[readPos] = null;
// Rest the reading and writing postions if the circle is empty.
if (readPos == writePos) {
readPos = -1;
writePos = -1;
}
return element;
}
public void incrementWritePos() {
writePos++;
// Write-postion reached the bottom of the array.
if (writePos == capacity) {
writePos = 0;
if (readPos == -1) {
readPos = 0;
}
return;
}
if (writePos == readPos) {
incrementReadPos();
}
}
public void incrementReadPos() {
readPos++;
// Read-postion reached the bottom of the array.
if (readPos == capacity) {
readPos = 0;
}
}
public String toString() {
return Arrays.toString(elements);
}
}
Output
-> javac CircularQueue.java
Note: CircularQueue.java uses unchecked or unsafe operations.
Note: Recompile with -Xlint:unchecked for details.
-> java CircularQueue
Print out the queue.
[a, b, c, d, e, f]
Add a new element to the full circle queue.
[g, b, c, d, e, f]
Read elements from the cilcle queue.
b
c
d
e
f
Add a new element X to the circle queue.
[g, X, null, null, null, null]
Continue reading elements from the circle queue.
g
[null, X, null, null, null, null]
X
[null, null, null, null, null, null]
Add new elements to the circle queue.
[Y, Z, null, null, null, null]
Read one more element from the circle queue.
Y
[null, Z, null, null, null, null]
The time complexity of enqueue and dequeue in this implementation are the same Θ(1).
]]>
Ring Buffer also is known as Circular Queue is a type of linear data structure. It following the FIFO rule of Queue, but it doesn't have an ending position. The last inserted item can overwrite the existing items, the front and rear are connected together like a ring and often used as Buffer in the software industry. That's why we call it Ring Buffer.
Question
4.3.41 Ring buffer. A ring buffer (or circular queue) is a FIFO collection that stores a sequence of items, up to a prespecified limit. If you insert an item into a ring buffer that is full, the new item replaces the least recently inserted item. Ring buffers are useful for transferring data between asynchronous processes and for storing log files. When the buffer is empty, the consumer waits until data is deposited; when the buffer is full, the producer waits to deposit data. Develop an API for a ring buffer and an implementation that uses a fixed-length array.
Computer Science An Interdisciplinary Approach (2016, page 260).
Implementing Steps
In this solution, we are going to use a fixed-length array as the element's container. Using the Enqueue and Dequeue methods to manage the elements. The differences between this implementation and a normal queue are the size of the elements are not incrementable and elements can be overwritten.
Here goes the key points:
Fixed-length array.
Using two variable to track the read-position and write-position of the queue. Initializing the value of two positions to -1.
if a position beyond the end of the array's length, reset the position to zero.
if the write-positon cached up with the front position, increase the read-position by 1.
if the read-position cached up with the write-position, reset positions to -1.
Be aware of the starting value of the two positions.
Solution
/******************************************************************************
* Compilation: javac CircularQueue.java
* Execution: java CircularQueue
*
* Using a fixed-length array to implement a FIFO queue.
*
* % java CircularQueue
* Print out the queue.
* [a, b, c, d, e, f]
*
* Add a new element to the full circle queue.
* [g, b, c, d, e, f]
*
* Read elements from the cilcle queue.
* b
* c
* d
* e
* f
*
* Add a new element X to the circle queue.
* [g, X, null, null, null, null]
* Continue reading elements from the circle queue.
* g
* [null, X, null, null, null, null]
* X
* [null, null, null, null, null, null]
*
* Add new elements to the circle queue.
* [Y, Z, null, null, null, null]
* Read one more element from the circle queue.
* Y
* [null, Z, null, null, null, null]
*
******************************************************************************/
import java.util.Arrays;
class CircularQueue<Item> {
private int capacity;
public int readPos = -1;
public int writePos = -1;
private Item[] elements;
public static void main(String[] args) {
CircularQueue<String> circle = new CircularQueue<String>(6);
circle.enqueue("a");
circle.enqueue("b");
circle.enqueue("c");
circle.enqueue("d");
circle.enqueue("e");
circle.enqueue("f");
System.out.println("Print out the queue.");
System.out.println(circle.toString());
System.out.println("\nAdd a new element to the full circle queue.");
circle.enqueue("g");
System.out.println(circle.toString());
System.out.println("\nRead elements from the cilcle queue.");
System.out.println(circle.dequeue());
System.out.println(circle.dequeue());
System.out.println(circle.dequeue());
System.out.println(circle.dequeue());
System.out.println(circle.dequeue());
System.out.println("\nAdd a new element X to the circle queue.");
circle.enqueue("X");
System.out.println(circle.toString());
System.out.println("Continue reading elements from the circle queue.");
System.out.println(circle.dequeue());
System.out.println(circle.toString());
System.out.println(circle.dequeue());
System.out.println(circle.toString());
System.out.println("\nAdd new elements to the circle queue.");
circle.enqueue("Y");
circle.enqueue("Z");
System.out.println(circle.toString());
System.out.println("Read one more element from the circle queue.");
System.out.println(circle.dequeue());
System.out.println(circle.toString());
}
public CircularQueue(int capacity) {
this.capacity = capacity;
elements = (Item[])new Object[capacity];
}
public void enqueue(Item item) {
incrementWritePos();
elements[writePos] = item;
}
public Item dequeue() {
incrementReadPos();
Item element = elements[readPos];
elements[readPos] = null;
// Rest the reading and writing postions if the circle is empty.
if (readPos == writePos) {
readPos = -1;
writePos = -1;
}
return element;
}
public void incrementWritePos() {
writePos++;
// Write-postion reached the bottom of the array.
if (writePos == capacity) {
writePos = 0;
if (readPos == -1) {
readPos = 0;
}
return;
}
if (writePos == readPos) {
incrementReadPos();
}
}
public void incrementReadPos() {
readPos++;
// Read-postion reached the bottom of the array.
if (readPos == capacity) {
readPos = 0;
}
}
public String toString() {
return Arrays.toString(elements);
}
}
Output
-> javac CircularQueue.java
Note: CircularQueue.java uses unchecked or unsafe operations.
Note: Recompile with -Xlint:unchecked for details.
-> java CircularQueue
Print out the queue.
[a, b, c, d, e, f]
Add a new element to the full circle queue.
[g, b, c, d, e, f]
Read elements from the cilcle queue.
b
c
d
e
f
Add a new element X to the circle queue.
[g, X, null, null, null, null]
Continue reading elements from the circle queue.
g
[null, X, null, null, null, null]
X
[null, null, null, null, null, null]
Add new elements to the circle queue.
[Y, Z, null, null, null, null]
Read one more element from the circle queue.
Y
[null, Z, null, null, null, null]
The time complexity of enqueue and dequeue in this implementation are the same Θ(1).
]]>2019-03-16T16:37:19+08:00Martin Tan<![CDATA[Using Java Queue to Solve the Josephus Problem]]>https://mrtan.me/post/23.html
Question
4.3.39 Josephus problem. In the Josephus problem from antiquity, n people are in dire straits and agree to the following strategy to reduce the population. They arrange themselves in a circle (at positions numbered from 0 to n 1) and proceed around the circle, eliminating every mth person until only one person is left. Leg- end has it that Josephus figured out where to sit to avoid being eliminated. Write a Queue client Josephus that takes two integer command-line arguments m and n and prints the order in which people are eliminated (and thus would show Jose- phus where to sit in the circle).
% java Josephus 2 7
1 3 5 0 4 2 6
Implementing Steps
In this solution, we are going to use the Queue as the position container. Using the Dequeue and Enequeue methods to iterate all the positions. Keep doing this until all of the positions are popped out.
Here goes the steps:
Create a Integer Queue.
Iterate all the items.
Find and remove the item at the eliminated position.
Copy the following code and save as JosephusQueue.java
Solution
/******************************************************************************
* Compilation: javac JosephusQueue.java
* Execution: java JosephusQueue args
* Dependencies: Queue.java @link https://mrtan.me/post/17.html
*
* Using Queue to print out the ordered eliminated positions
* in Josephus Problem.
*
* % java JosephusQueue 2 7
* 1 3 5 0 4 2 6
*
******************************************************************************/
class JosephusQueue {
public static void main(String[] args) {
int position = Integer.parseInt(args[0]);
int count = Integer.parseInt(args[1]);
printJosephusPositions(count, position);
}
public static void printJosephusPositions(int count, int position) {
Queue<Integer> queue = new Queue<Integer>();
for (int i = 0; i < count; i++) {
queue.enqueue(i);
}
while(!queue.isEmpty()) {
// The eliminated position counted from 1.
for (int i = 1; i <= position; i++) {
int eliminatedPosition = queue.dequeue();
if (i == position) {
System.out.print(eliminatedPosition + " ");
break;
}
queue.enqueue(eliminatedPosition);
}
}
}
}
Output
-> java JosephusQueue 2 7
1 3 5 0 4 2 6
The time complexity of this method is O(n).
]]>
Question
4.3.39 Josephus problem. In the Josephus problem from antiquity, n people are in dire straits and agree to the following strategy to reduce the population. They arrange themselves in a circle (at positions numbered from 0 to n 1) and proceed around the circle, eliminating every mth person until only one person is left. Leg- end has it that Josephus figured out where to sit to avoid being eliminated. Write a Queue client Josephus that takes two integer command-line arguments m and n and prints the order in which people are eliminated (and thus would show Jose- phus where to sit in the circle).
% java Josephus 2 7
1 3 5 0 4 2 6
Implementing Steps
In this solution, we are going to use the Queue as the position container. Using the Dequeue and Enequeue methods to iterate all the positions. Keep doing this until all of the positions are popped out.
Here goes the steps:
Create a Integer Queue.
Iterate all the items.
Find and remove the item at the eliminated position.